DIY Moving Announcement

Hello everybody!

I hope you guys are well.

I’m currently hooked on the HGTV channel and learning a lot about homes, renovations, design and concept.  I’ve been watching shows like Property Brothers, Love It or List It, House Hunters, and My First Place.  It’s great to see homes that need some TLC or more come to life with the right renovations and design touches.  I also like the advice and tips that are given, for example, in kitchens today the soft closing feature on drawers and cabinets enable you to close them without a loud banging sound or pinched fingers.  When you have kids this is definitely a feature you want in your home.

We are currently house hunting and all this newfound information (open concept, travertine floors, neutral colors, etc.) is going to come in handy once we find and settle into our new home.  When that happens I thought of a crafty way to announce our new address.  Here’s a DIY moving announcement that you can make and it’ll be a nice keepsake for yourself, your family and friends:

IMG_5547text

I found this cute, little house cut out made out of wood at AC Moore craft store.  It’s less than a dollar and weighs less than an ounce so mailing it won’t be a problem.  I also bought a couple of Martha Stewart acrylic paint and I already had a booklet of rub on letters, which is going to make the wording on the house a whole lot easier if you’re not comfortable with your hand writing skills.  If you are, then you can always use a fine point sharpie marker.  The sand paper came in handy to make the house a little smoother around the edges.

IMG_5554text

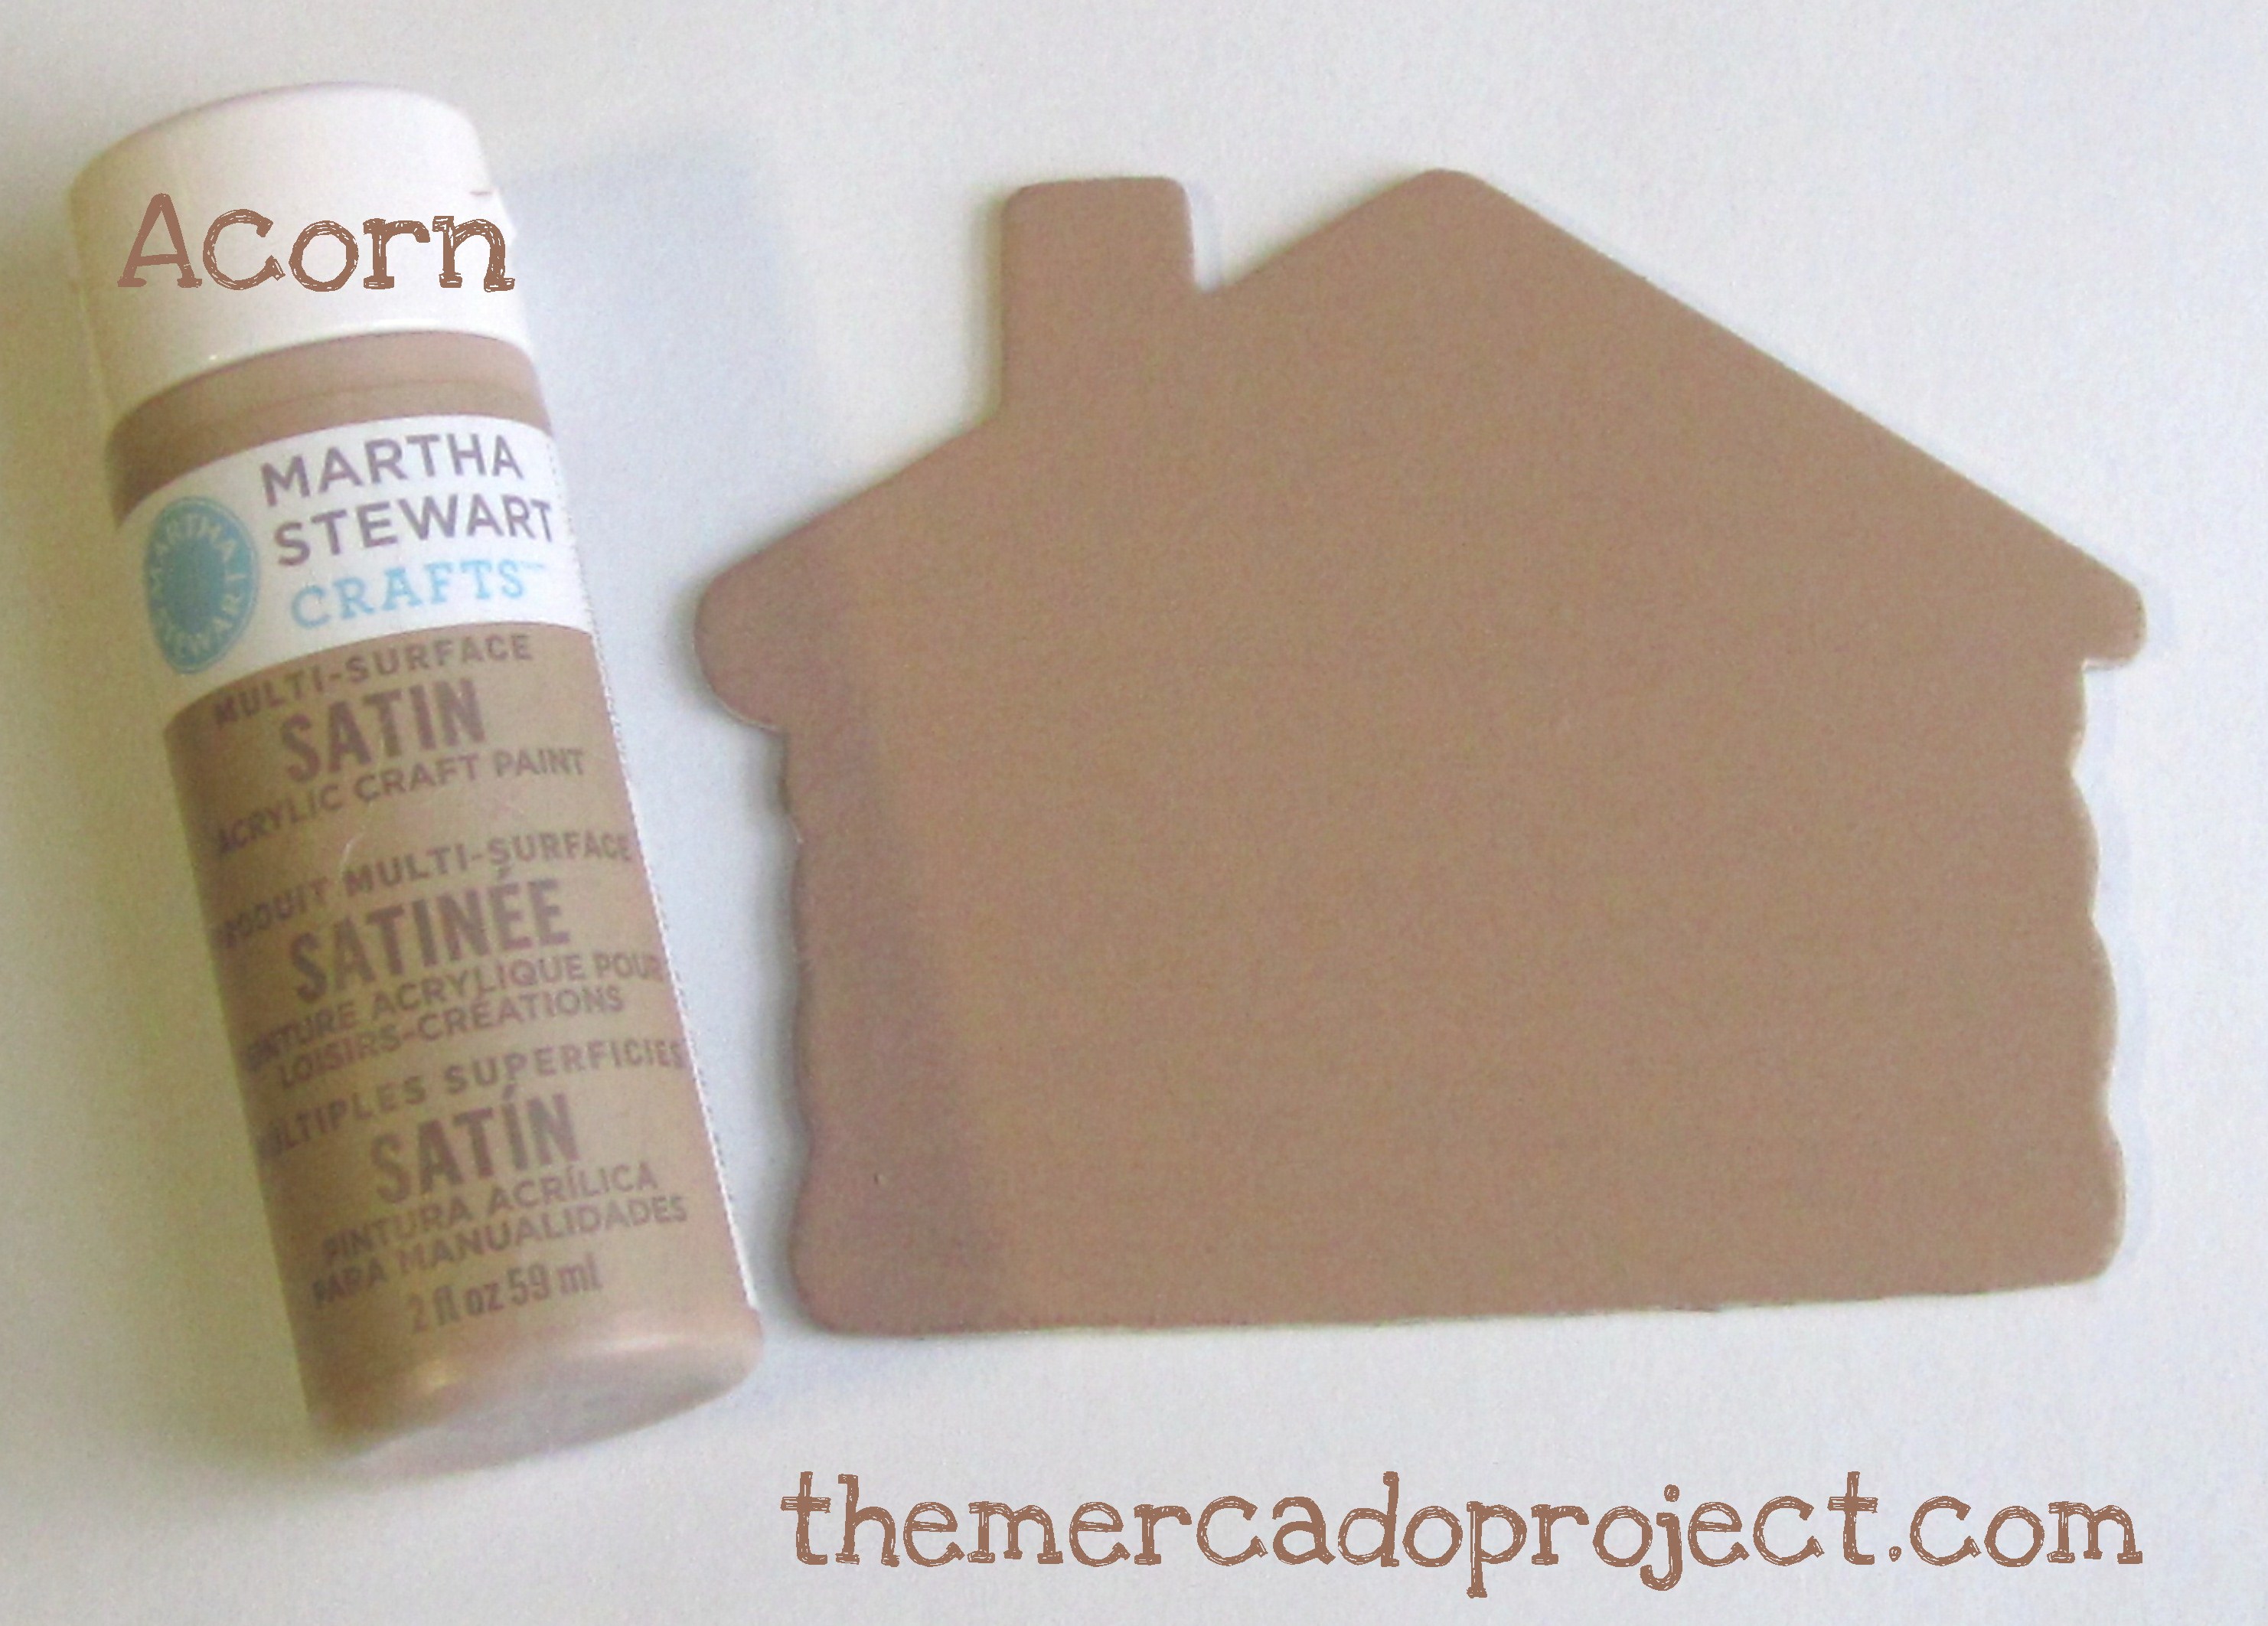
I gave the house two coats of this great color, front and back.

IMG_5555text  IMG_5557text

I used the second color on the edges of the house, which made it look like snow.

IMG_5558text

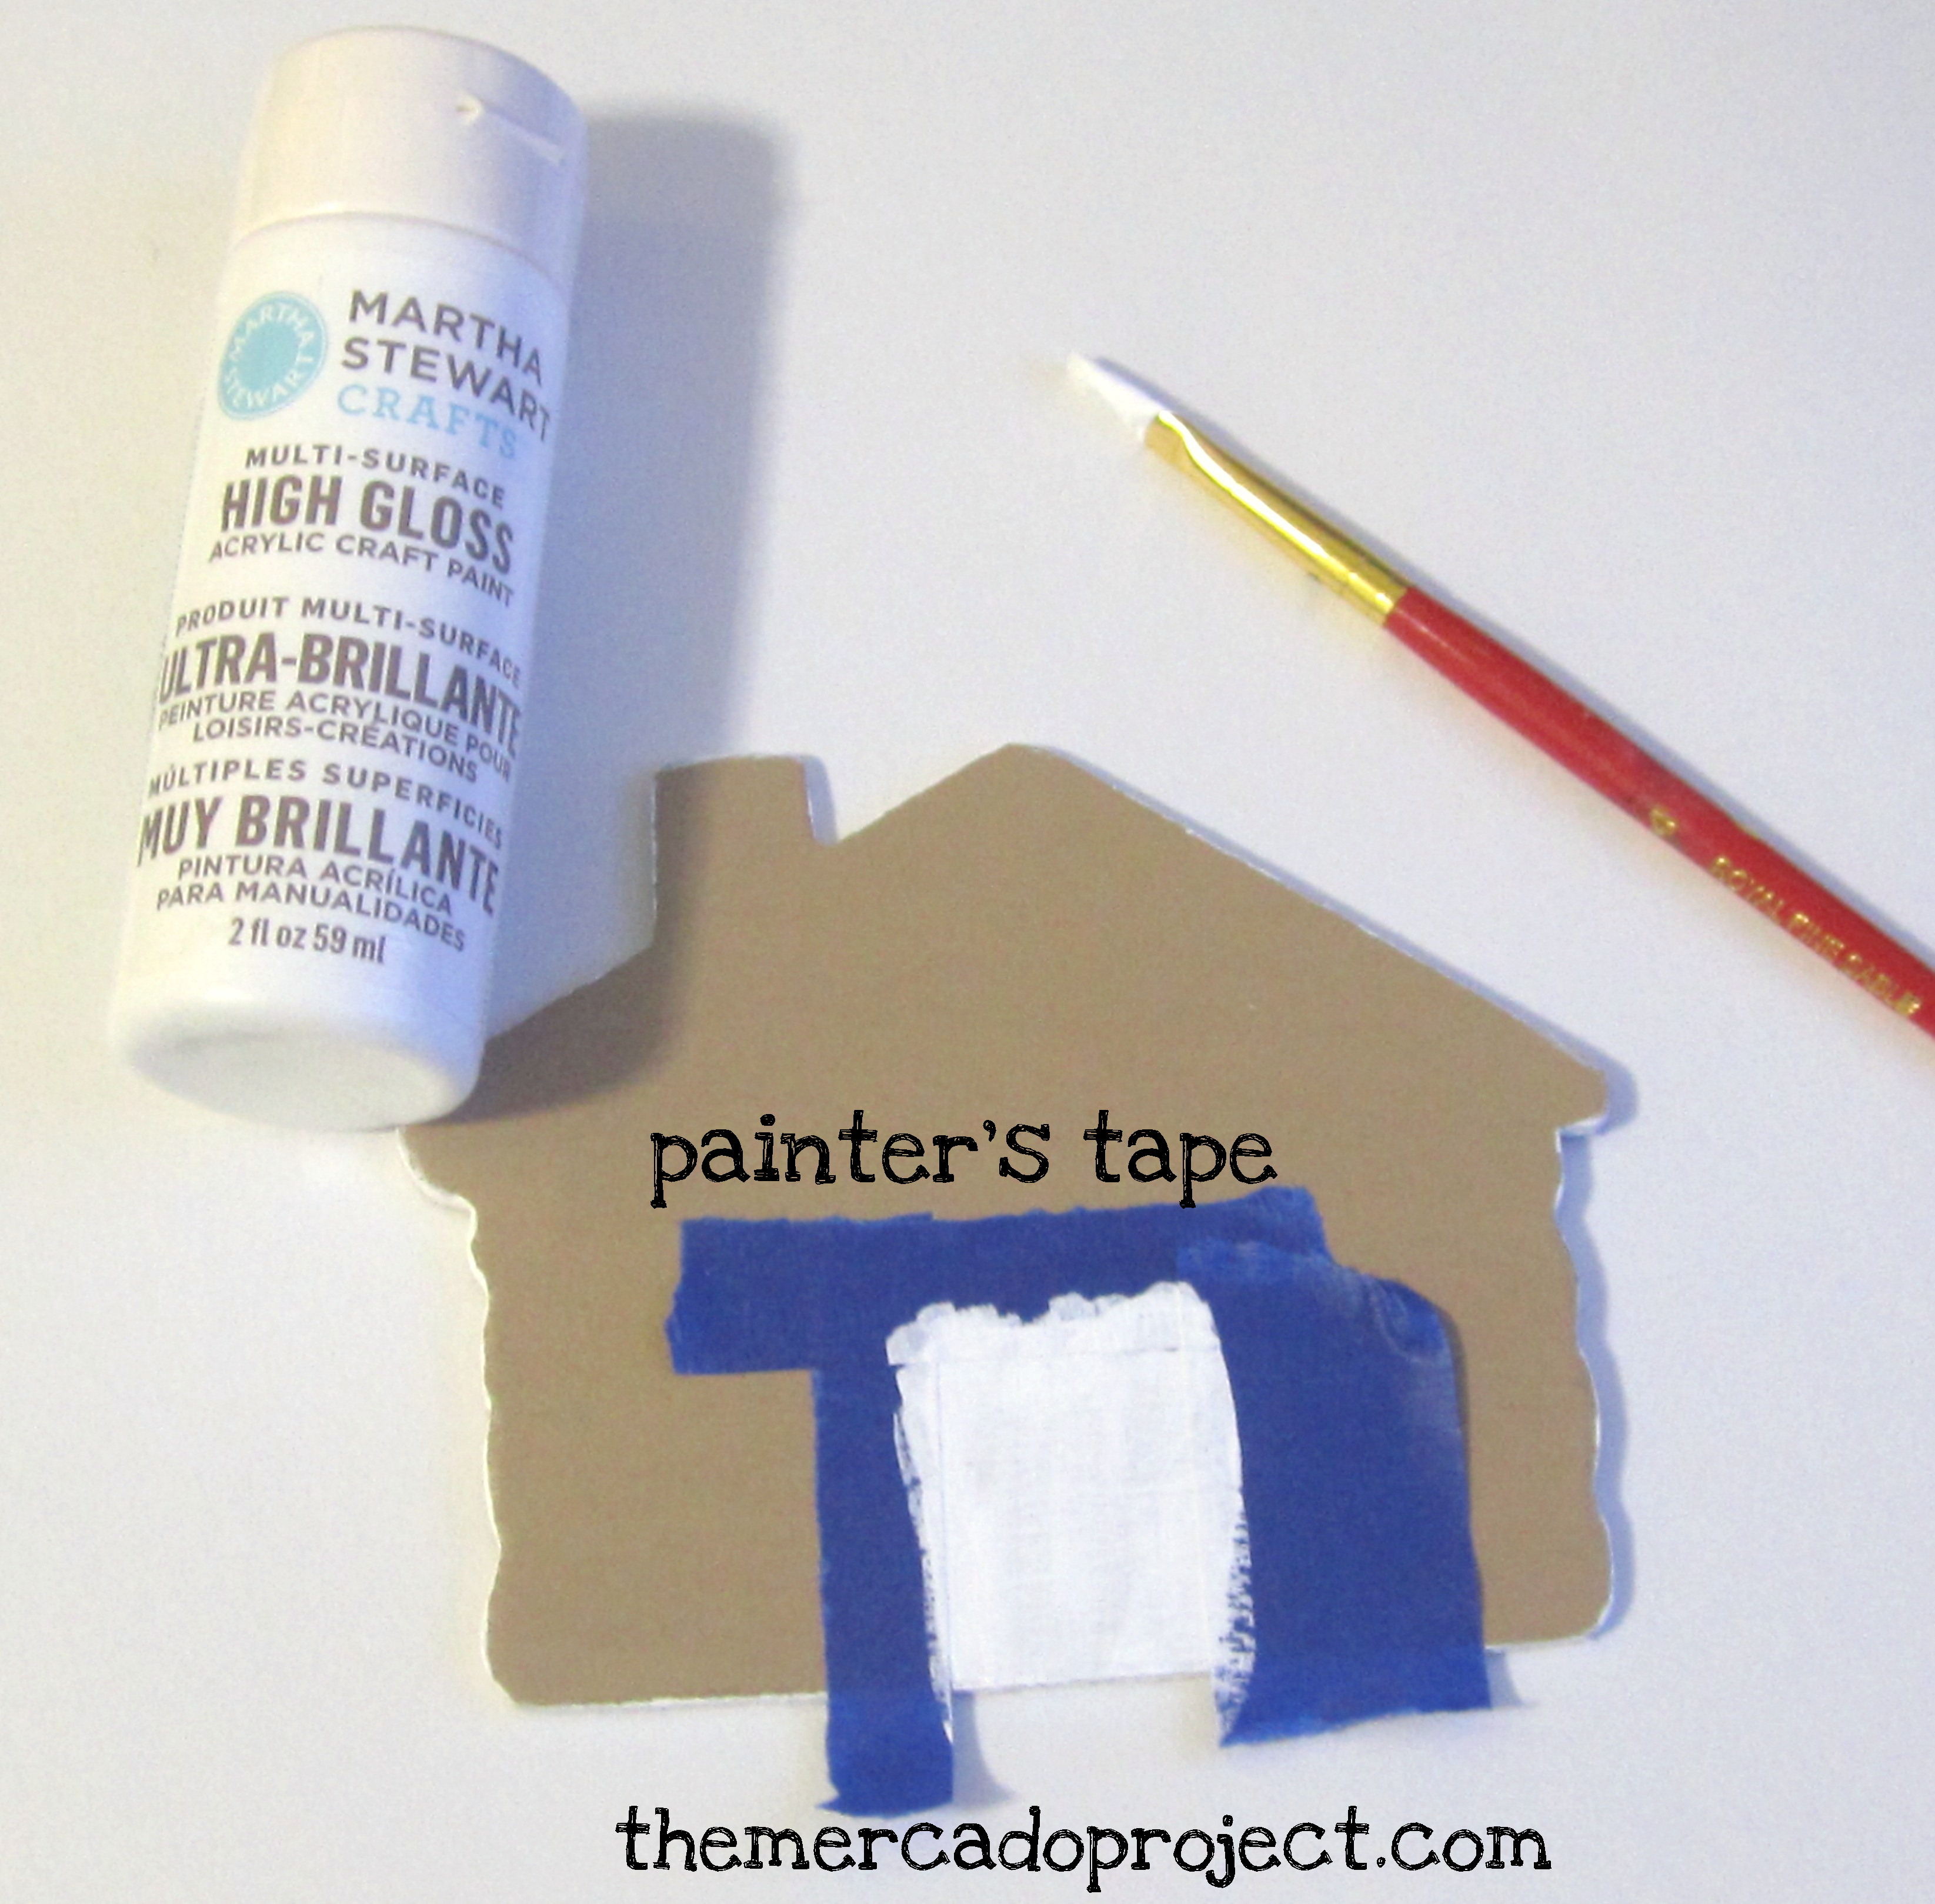
Using painter’s tape I painted a door.

IMG_5560text2

I outlined the door with black paint using painter’s tape as well and with a red pen, drew a heart for the door knob.  Of course, if you’re more artistic than I am you can add more details to your house.  Just leave enough space for your new address.

IMG_5560text  IMG_5560text3

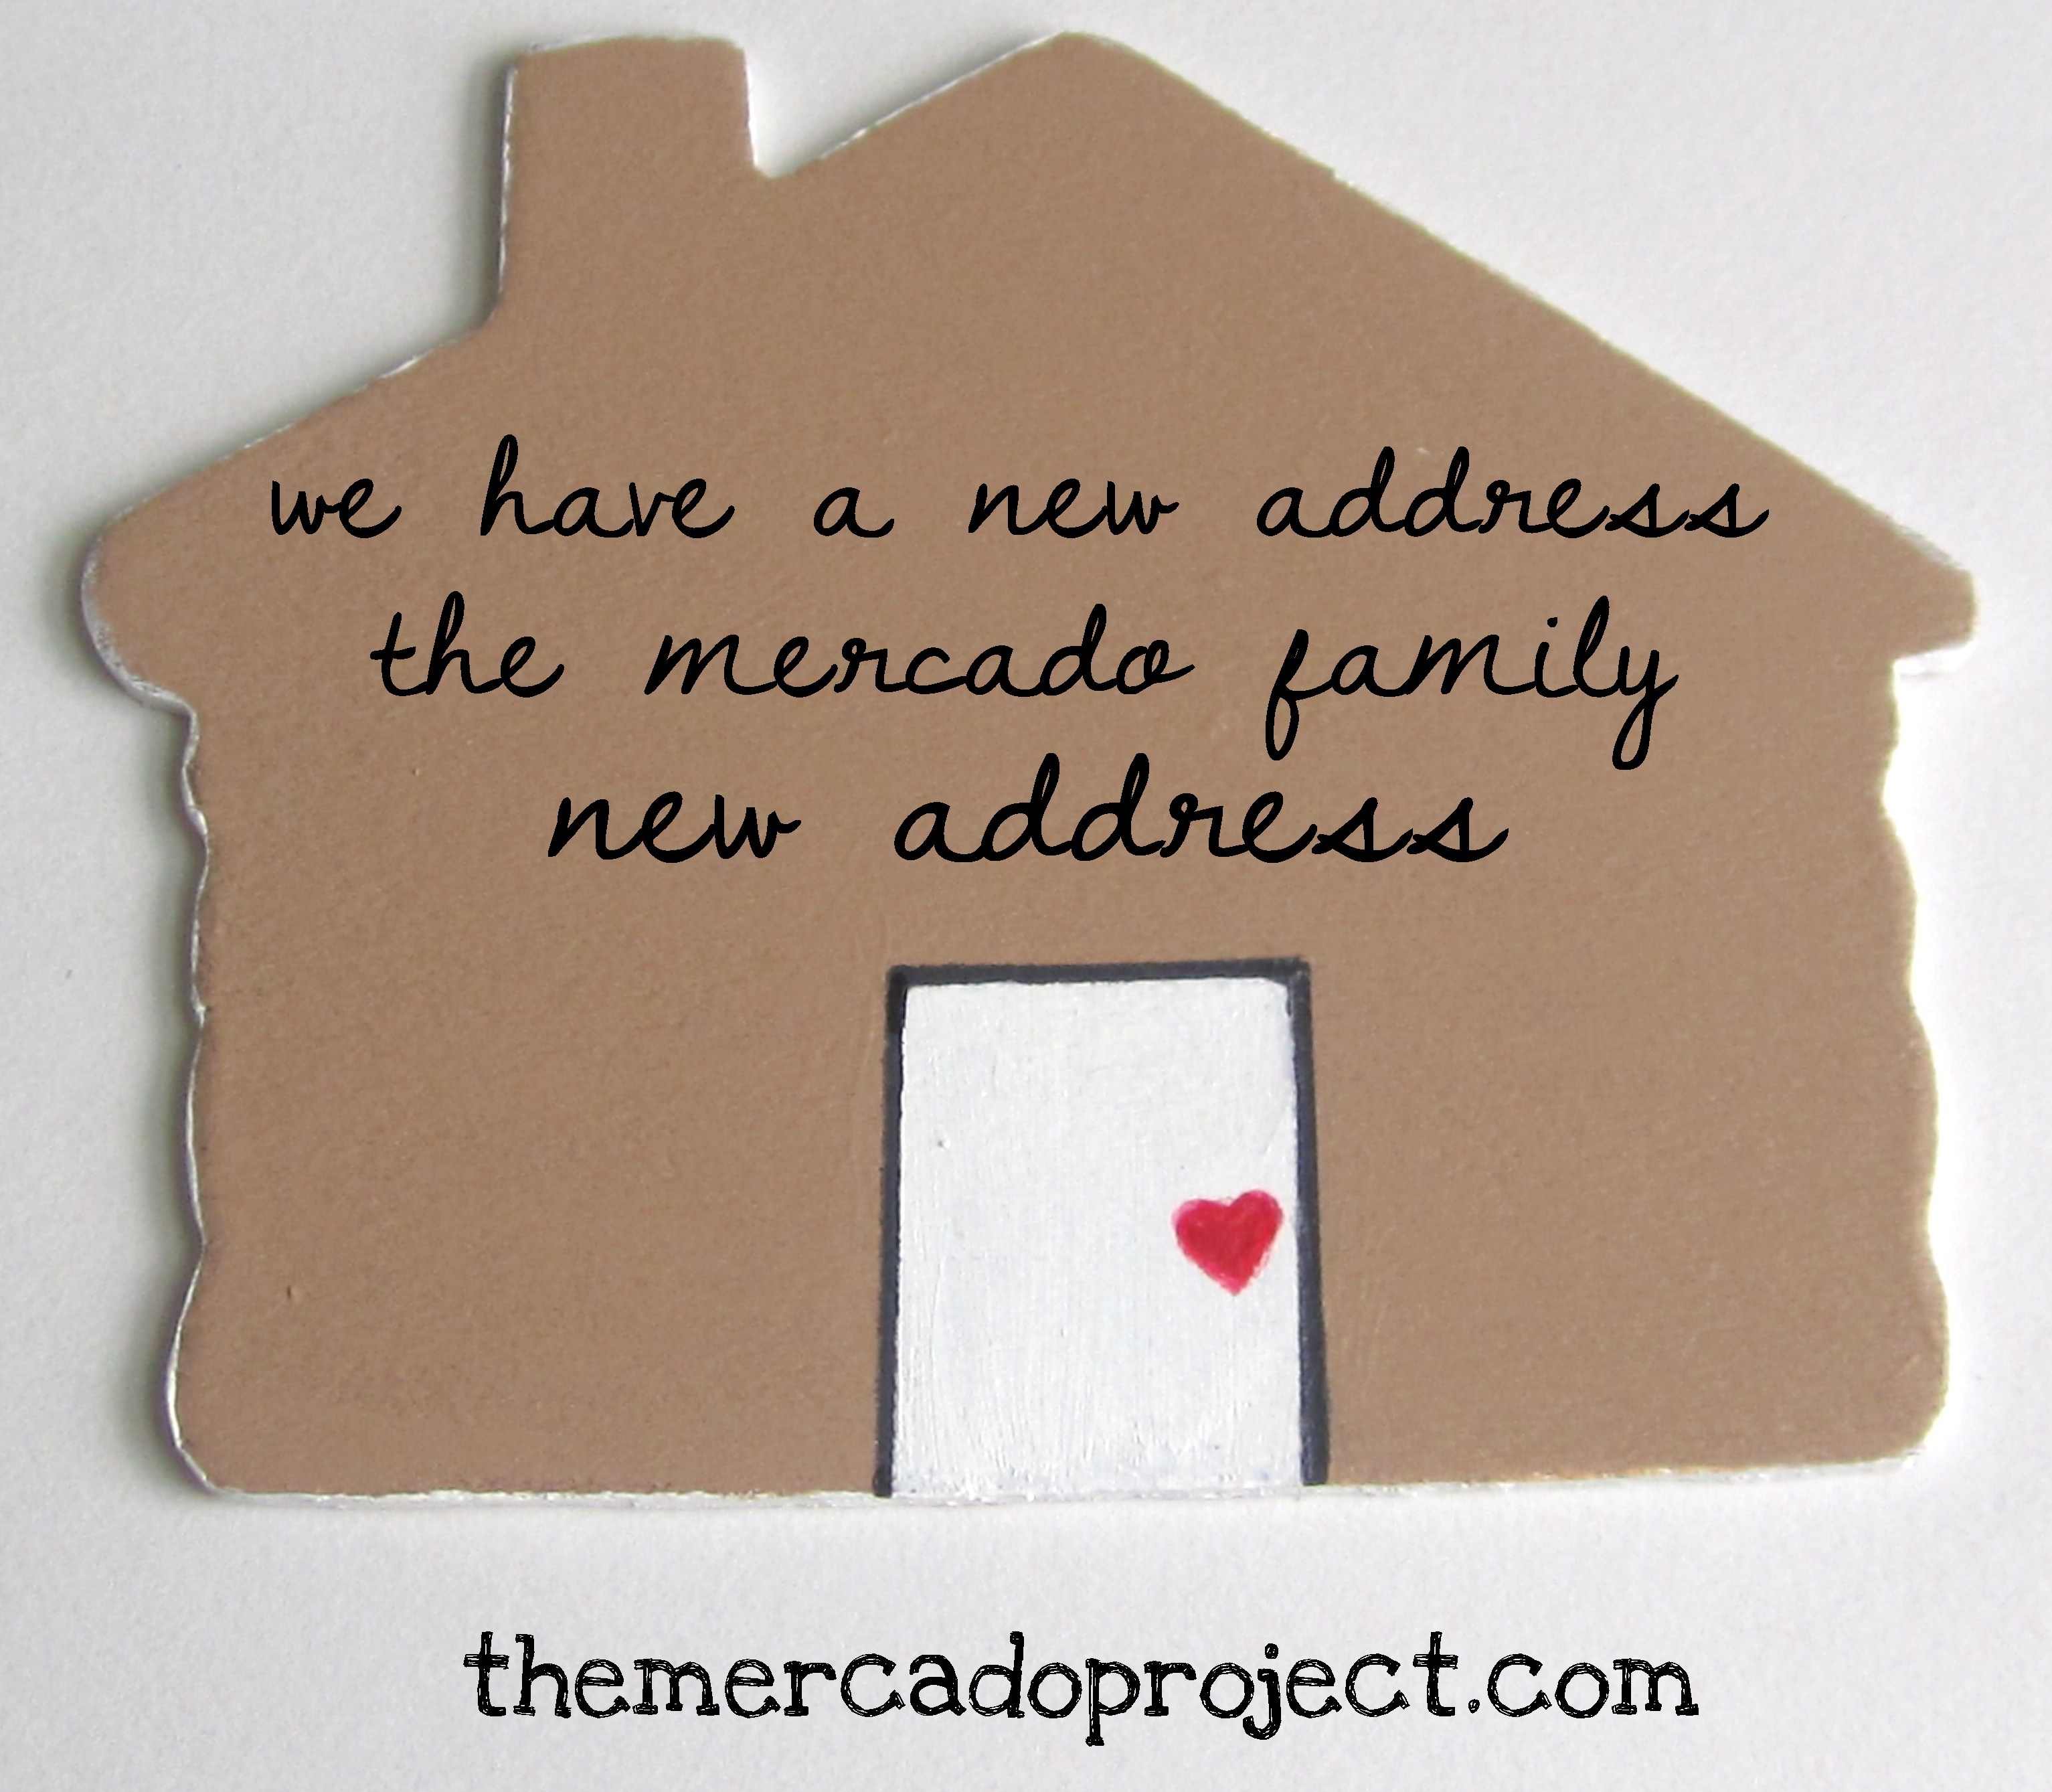
Using my computer, here are two examples of wording for your moving announcement.  Again you can write it in yourself with a fine point sharpie marker or use rub on letters.

I think this is a unique and fun way to tell your family and friends about your new address.  You can also drill a hole at the top, add a ribbon and make this an ornament or hang it on your wall.

I can’t wait to make some more of these moving announcements once we close on a house, fingers tightly crossed.

Take good care all.

Until next time…

Advertisement

Mini doughnut pan

Hello everybody!

I hope you guys are well.

Here in New York City, we are battling a heat wave.  The temperature is above 90 degrees, but the humidity makes it feel like 100 and above.  It’s horrible and disgusting.  We’re doing our best to entertain ourselves at home with the AC at full blast.

Enter our newest purchase, the Wilton mini doughnut pan, which we got at AC Moore craft store with a 50 percent coupon.  My husband fell in love with this pan along with the savings (the current plan is to get a second pan to make it less time consuming).  He tried it out first with Jiffy’s chocolate muffin mix, but he forgot to take pictures.  When it was my turn, I tried the raspberry muffin mix and it was definitely a learning experience.

IMG_5460text   IMG_5462text  IMG_5464text

I was able to make two batches (24 total).  The first batch I put too much batter in the pan so the muffin/doughnuts came out like little bowls (open on one side, which is cool because you can put something inside for example whipped cream and eat/present it like that or just eat it as is).  The second batch I put less batter but I still got some that came out like bowls.  It’s a trial and error kind of thing.  I’m figuring that with more batches I’ll get the right consistency one day.  I’m looking forward to making cake doughnuts, that’s next, and of course finding a good doughnut recipe to try.  Duh!  In the meantime, these muffin doughnuts were delicious and a big hit with my daughters.  I also like that they’re small so consumption can be kept under control.

Bon appétit!

Take good care all.

Until next time…

Celebration Recap

Hello everybody!  I hope you guys are well.

My youngest daughter is officially three and we had a birthday week-end celebration with friends and family.  We broke things down by celebrating her actual birthday on Friday, just us in the house.  I wanted to make a small (I like the Jiffy cake mix), funfetti cake

IMG_4362text

and it was the perfect time to try out these Bake-Even Cake Strips (Wilton) that I’ve seen online and found on sale at AC Moore craft store.

IMG_4364text

IMG_4363text

I didn’t realize I went overboard on the sprinkles until…

IMG_4373text  IMG_4374text

…the cake was done and I flipped it out of the baking pan.

As you can see the cake strip (around the pan) worked, but there were noticeable differences other than the cake dome that appears when you don’t use this strip.  The cake sticks to the side of the pan more and the bottom was moist when I took it out.  I like that it baked even, but I don’t know if I’m going to use the strip again.  We’ll see.

IMG_4383text

I melted a little bit of the Betty Crocker Rich & Creamy Chocolate frosting (15 seconds in the microwave) in a glass bowl and this made things easy to spread on the cake.  I really don’t like when the cake crumbs combine with the frosting.  I threw a little bit more of sprinkles, yes more, on the frosting and then…

IMG_4384text  IMG_4388text

…the #3 candle.  My daughter loved her funfetti cake.

I chose the theme of the cartoon Bubble Guppies featured on Nickelodeon.  I decorated with free printables from nickjr.com and purchased a huge #3 balloon.  Balloons are always a huge hit.

IMG_4341text IMG_4517text IMG_4515text IMG_4381text

The banner, poster, and pin the tail game were cute, easy, and fun to put together.  Just go to nickjr.com and click on birthdays and you’ll see all of the themes and projects available for each.

The following day was Saturday and we invited friends and family with kids to join us at an indoor playground/arcade (funtopiausa.com).  We paid for the kids admission, tokens for them to play the arcade games, and food (pizza, popcorn, and drinks).  We stayed for about two hours and when it was time to go I gave each invited guest a goody box filled with candy, toys and stickers.

IMG_4310text      IMG_4312text     IMG_4313text      IMG_4315text

My aunt had given me these boxes about a year ago and I was so happy to finally have a reason to use them.  I glued the images of the Bubble Guppies, which I printed out at nickjr.com, and made the middle image with my daughter’s name.  I then took the glitter glue in blue and green and made swirl lines like waves on the boxes.  I then filled the boxes with candy (skittles, smarties, Tootsie rolls, lollipop, rose ring pop, candy bracelet, and sixlets) from orientaltrading.com along with little toys like a mushroom spinning top (not shown) and Easter Pop-Ups, which are a lot of fun for children and adults.

We ended the day with my husband’s homemade piñata, which he made with a balloon, scraps of paper, and modge podge.

IMG_4440text     IMG_4439text

My husband had fun making this and the kids had a lot more fun whacking the heck out of it.

IMG_4494text IMG_4503text

On our last day of celebration (Sunday), my family came over and we sang happy birthday once again with another cake (Oreo No Bake Dessert), chocolate lollipops (vanilla, dark mint, & peanut butter), and great, homemade food.  Thanks Mom and my aunt Aida!

I was pretty happy with this plan of action for celebrating my daughter’s birthday.  Many people get really stressed out planning birthdays and end up spending a lot of money.  I didn’t want the headaches or the empty wallet.  No offense to anyone who goes big, because of course, if I had space and extra money, I would be singing a different tune, but at this moment minimal is the way to go.  So one birthday down, one more to go.

Take good care all and thanks for visiting.

Until next time…