Easy DIY Wonder Woman Headband and Wrist Cuffs using Felt

Hello everybody!

I hope you guys are well.

Since Halloween is just around the corner here’s a quick DIY costume accessories idea for Wonder Woman.
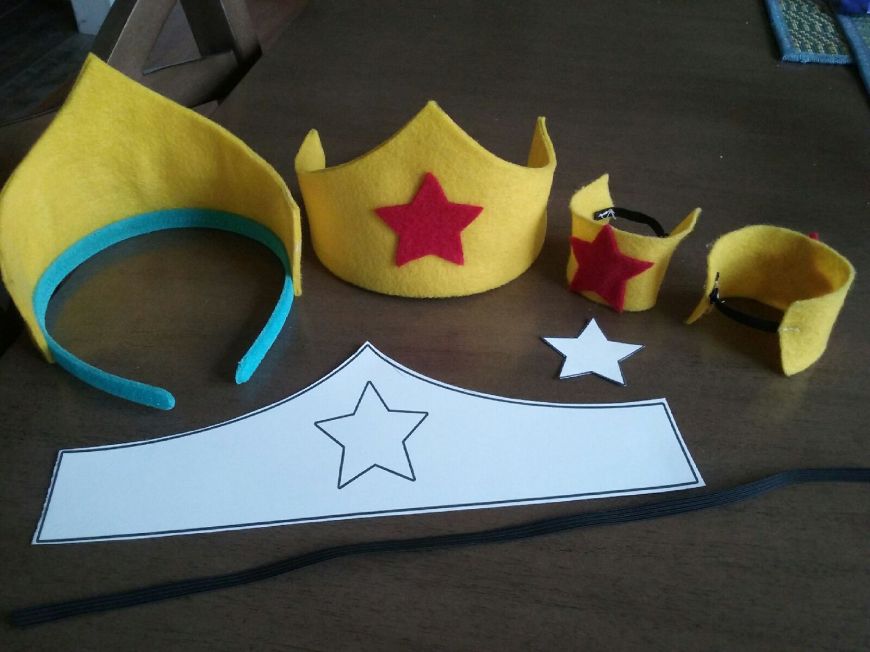
20161026_143526I made these headpieces and wrist cuffs for my daughters who wanted something simple to wear on Superhero day at their school. They wore a plain blue shirt and jeans so the accessories would pop out more.  They didn’t want to do the typical cape and mask thing so I found a good template online for Wonder Woman’s headband and got to work.

Using the template to get the design, I folded the felt in half to make it sturdier with two layers of felt as oppose to just a single layer.  I glued the headpiece at the edges with some tacky glue and then made the stars with a template and red felt.  I then glued the headpiece onto the plain headband.  The tacky glue doesn’t dry instantly so I used large paperclips to secure the felt onto the headband until it dried.  It worked like a charm.  For the wrist cuffs I simply cut out a long rectangular piece from the yellow felt and split it in half.  I then glued the stars in the middle and sewed on a small piece of elastic so they could slide it onto their wrist and have fun pretending to be Wonder Woman, which they did.  

I hope you like this idea!

Take good care all.

Until next time…
Crazy Hair Day

Hello everybody!

I hope you guys are well.

Last week we celebrated all things great of Dr. Seuss with book readings, poems, and special activities that included wearing a hat to school (crazy or favorite), Dr. Seuss colors (black, white, and red), pajamas, and our favorite, crazy hair.  Of course, my daughters were super excited, especially my young one because it was going to be her very first crazy hair day at school.

I wanted to do something special, but keep things simple at the same time.  This is what we came up with:

crazy hair day 2                crazy hair day 1

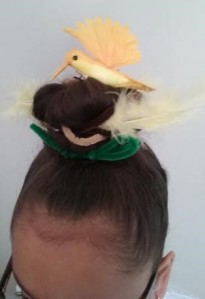
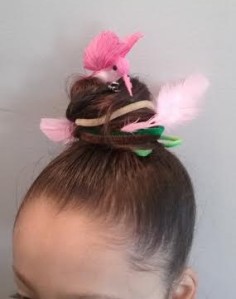
We decided to turn a hair bun into a birdie’s nest by taking brown, tan, and green pipe cleaners and twisting them around the bun so they could look like twigs and leaves.  Then we stuck several feathers in and last but definitely not least, the main attraction was these little paper birdies that we found at AC Moore craft store.  It was easy to attach the birds onto the bun because the birds already had a metal hair clip.

Of course, these buns can be decorated more and taken to another level, but like I said before, I wanted to keep things simple.  My girls were super happy with the results (mission accomplish!) and ready to participate in crazy hair day.

Take this idea and let your imagination and creativity fly!

Take good care all.

Until next time…
“Just being Audrey”

Hello everybody!

I hope you guys are well.

A couple of months ago, my youngest daughter stumbled upon this book at the library and was fascinated with the front cover.

20160101_145412

“Just Being Audrey” by Margaret Cardillo, Illustrated by Julia Denos

She simply said, “She’s beautiful,” and I responded, “She sure is.”

Of course, this biography book for children made it to our checkout pile and my daughters were wonderfully introduced to Audrey Hepburn.  The illustrations inside were just as beautiful as the front cover.  What made this book even more fantastic for me was when I suggested to my youngest daughter that she should draw her own version of the front cover and her eyes immediately lit up at the idea (my oldest daughter loves to draw and my youngest loves emulating her sister, so she’s a little budding artist as well.)  The very next morning she sat down on the floor with her drawing pad, a pencil and the Audrey book.  Her concentration was fierce and it took all morning.  I gave her space and didn’t peek once.

Finally, she was ready to unveil her masterpiece.

20151214_094030 (2)

Needless to say, I was one proud mama and I couldn’t stop gushing over her drawing.  She did a great job! 🙂

A book that teaches you about a great person and has illustrations that can inspire a 5 year old to draw her own version is a definite gemstone.  Check it out at your local library and if they don’t have it, request it!

Take good care all.

Until next time…

Books, books, oh glorious books!

Hello everybody!

I hope you guys are well.

One of my absolute favorite places to visit in our hometown is the library.  We officially celebrated our one year anniversary living in Pennsylvania back in November of 2015.  The library here is completely different in so many wonderful ways.  The vast hours of operation offers us an opportunity to visit as a complete family.  The children’s section of the library is spacious, it’s equipped with touch screen computers, educational toys, and hard-covered books galore.  I was so impressed and immediately fell in love with this place.

Before we leave the library, we always check out almost 40 books, which include a variety of easy to read, picture, newly published, and juvenile chapter books.  It’s become a routine to read a couple of books every night before bedtime so we need a lot of material.  My girls usually pick the books that they want and I tend to add to that pile with my picks for them.  My youngest is in Kindergarten now and she loves easy to read books.  She also loves picture books, which is why she was immediately drawn to the cover of this particular book:

“Golden Domes and Silver Lanterns: A Muslim Book of Colors” by Hena Khan, Illustrated by Mehrdokht Amini

She wasn’t able to read the title.  She simply saw the beautiful cover and quickly glanced inside and saw the rest of the illustrations and wanted to take it home.  When I read the title, I’m not going to lie to you, the word Muslim jumped right at me, but I had no qualms about checking the book out.  In fact, I was curious to see and read the book.  It looked interesting and it was indeed a great book with beautiful illustrations of colors in the Muslim culture.  I had no idea, until recently when I went online searching for a picture of this book to include in my blog post, that this book had a little controversy behind it.  You can google the title of this book and read the article about a father in Georgia who wasn’t happy that his daughter picked this book out at the school book fair.  Yes, everybody is entitled to their own opinion, but believe me when I say that this book is a beautifully, illustrated book about colors in the Muslim culture.  You should check it out at your local library and make your own opinion about it.  And if they don’t have it, request it!

I will be sharing more book finds with you because there are so many books in this world that need to be acknowledged and praised.  I love reading to my girls and hearing them read out loud.  I have seen great results in their reading skills from their first marking period in school to the second, which just passed about a week ago.  My third grader is currently reading at a fifth grade level and my five year old went from reading zero sight words to 59.

my daughters reading at the library

I’m going to leave you with this little tidbit regarding instructions/directions usually found at the bottom of homework assignments or school worksheets like this for example:

Instead of just reading the directions to your child and doing the problems together, teach your child to read the instructions as well and make it a habit.  Read the directions for each problem together and eventually they will learn how to read it themselves.

Take good care all.

Until next time…

Coming to you from a new home in Pennsylvania!

Hi guys!

I hope you are all well and ready for the Christmas countdown!

I know, it’s been awhile.  So much has gone down and that’s the reason why I haven’t been posting.  We’re no longer living in Brooklyn, NY.  We made the big move to Pennsylvania on the 1st of November and so far things are well.  Slowly, but surely we’re settling into our new home.  My mind and heart hasn’t quite adjusted to the move, but I’m doing my best to sort of embrace the new location.  It’s definitely a better place for my girls to grow up in so I’m taking that into great account.  I just have to take things one day at a time!

In the meantime an idea  sprung up in my mind and I wanted to share it with you guys.  My girls are very fortunate to receive Christmas gifts from friends and family members who don’t live near us and I’m always telling them on Christmas day, “This is from so and so,” but I can always see their little faces trying to register who the person is and I don’t think they get it.  This year while I was making the labels for their presents that came in the mail I thought, “Maybe I can print out their pictures on the label.”  

Using Word and address labels, I printed the wording and the pictures separately because my program didn’t allow me to cut and paste the pic.  You can always print everything out on Word and simply tape it onto the gift, but I didn’t want to use tape.  I just improvised by cutting and using another label to assemble the words and pics together.  This is what I got and I love it:

CAM01494teext

These lovely people are my girls’ paternal grandfather and step-grandmother who live in New York, so this year when they open their gifts from them they’ll actually see who the gift is from. 🙂

I hope you enjoyed this idea.  More to come later on, hopefully.

Thanks for stopping by and may all your holidays be MERRY, SAFE, AND BRIGHT!

Take good care all.

Until next time…

April Fool’s Brownies

Hello everybody!

I hope you guys are well.

Happy April Fool’s Day!  My oldest daughter, Olivia, woke up today super excited because it’s April Fool’s Day and she really wants to pull a prank on someone.  That someone is her dad so I went on Pinterest and searched for silly pranks.  There was one in particular that was cute, simple to do and silly enough for a six-year-old to enjoy.

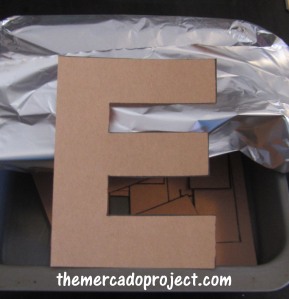
So we’re baking a batch of brownies for dear old dad, oh wait did I just say/write baking brownies.  No, what I meant was we’re making brown E’s for unsuspecting, dear old dad.  Check it out:

IMG_6468text     IMG_6470textIMG_6471text      IMG_6473text

I left some E’s for Olivia to cut out once she got home from school, then we put a book inside the baking pan (so it could feel heavy), placed all the E’s inside, and closed it up with aluminum foil.

I even put it inside the oven, which prompted my youngest to say, “Oh no, the E’s are going to get hot,” even though I didn’t turn it on.  🙂

Needless to say, once my husband got home from work, the girls couldn’t contain themselves.  Sophia kept shouting, “April Fool’s Day!” so I quickly told my husband to sit down ’cause we made him some brownies before our prank was revealed.

We brought the pan of brownies and told him to uncover the pan completely.

The result:

My husband was surprised and happy with the brown E’s, but then really sad ’cause there wasn’t any real brownies. 🙂

Happy April Fool’s Day everyone!

Take good care all.

Until next time…


A birthday cake mini poster/card

Hello everybody!

I hope you guys are well.

It’s always great to celebrate someone’s birthday and giving something uniquely handmade is especially exciting.  That’s why I loved this idea from Melanie Blodgett over at youaremyfave.com (one of my favorite blogs).

Check out her idea…

http://www.youaremyfave.com/2014/02/17/a-birthday-cake-you-can-send-in-the-mail-is-my-fave/

…and now take a look at my version/attempt.

IMG_6400text

I made this mini poster/card for my mother’s birthday.  I used acrylic paint, paper (about 11 x 14), and paintbrushes.  After the paint was all dry, I rolled up the paper and tied it with a ribbon and presented it to my mom, who absolutely loved her cake plus the fact that it only had 25 candles.  🙂

Thanks Melanie for the great idea!

Take good care all.

Until next time…

Personalized Paper Bows

Hello everybody!

I hope you guys are well.

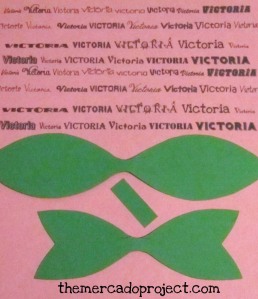
I’m officially obsessed with this paper bow template (http://howaboutorange.blogspot.com/2013/04/how-to-make-paper-bow.html) and that’s okay with me.  I’m going to my niece and nephew’s birthday party and I wanted to personalize their gift bows.  It takes a little time, but the end result is wonderful, at least in my opinion!

IMG_6153text

I used construction paper for the first bow and printed out the name in various fonts on Word.

IMG_6156text

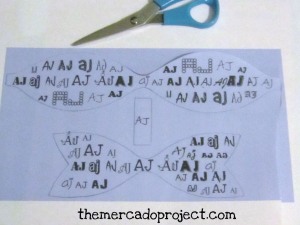
For the second bow, I scanned the template and uploaded it on Word, then changed the color and inserted the name, here and there in various fonts as well.

IMG_6157text

IMG_6160text

I love these personalized bows and can’t wait to make and use them for my Christmas presents.

Take good care all.

Until next time…

Obsessing over my visual board online

Hello everybody!

I hope you guys are well.

I’ve been spending a lot of time over at Pinterest browsing and creating boards for myself since I’m in a writer’s rut at the moment.  I’ve mentioned before that we’re house hunting so browsing through pins on home decor is immensely inspiring.  Putting together a visual board online allows me to see what I want for my future.  I try my best not to pin things that are out of my league, financially speaking, but if it’s an idea that can be done another way that fits my budget then it gets pinned onto my board.  So far I’m obsessed with the chevron pattern, which is weird, because I have nothing in my current dwelling with that pattern, but after seeing it as a design on a single wall complimenting a room or even on the floor as a design, I was hooked and can’t wait to try my hand at it.  Hopefully, it doesn’t turn out to be a disaster or a “nailed it” picture (type in “nailed it” in Pinterest and you’ll see what I’m talking about.)  Check out some of the pins that I’ve been currently obsessing over:

0de0cfdca2e198e44c2d6b8220afe4aa

paint colors

http://pinterest.com/pin/459578336945243811/

http://fabuloushomeblog.com/2013/01/20/colours-ive-heard-that-hawthorne-yellow-and-revere-pewter-were-the-best-colors-in-the-paint-world-good-yellows-are-very-hard-to-find-so-im-remembering-this-one/

5c78bbd3e83541a0186645bbd33522f9

chevron wall

http://pinterest.com/pin/459578336945124253/

http://www.ruthiehart.com/2012/05/diy-chevron-wall_09.html

chevron floors

chevron floor

http://pinterest.com/pin/459578336944920275/

http://pinyourhome.com/

laundry room

small laundry room makeover

http://pinterest.com/pin/459578336944725069/

http://www.viewalongtheway.com/housetour/

There are so many talented people in this world and I’m so happy they want to share their ideas and creativity.

Take good care all.

Until next time…

DIY Moving Announcement

Hello everybody!

I hope you guys are well.

I’m currently hooked on the HGTV channel and learning a lot about homes, renovations, design and concept.  I’ve been watching shows like Property Brothers, Love It or List It, House Hunters, and My First Place.  It’s great to see homes that need some TLC or more come to life with the right renovations and design touches.  I also like the advice and tips that are given, for example, in kitchens today the soft closing feature on drawers and cabinets enable you to close them without a loud banging sound or pinched fingers.  When you have kids this is definitely a feature you want in your home.

We are currently house hunting and all this newfound information (open concept, travertine floors, neutral colors, etc.) is going to come in handy once we find and settle into our new home.  When that happens I thought of a crafty way to announce our new address.  Here’s a DIY moving announcement that you can make and it’ll be a nice keepsake for yourself, your family and friends:

IMG_5547text

I found this cute, little house cut out made out of wood at AC Moore craft store.  It’s less than a dollar and weighs less than an ounce so mailing it won’t be a problem.  I also bought a couple of Martha Stewart acrylic paint and I already had a booklet of rub on letters, which is going to make the wording on the house a whole lot easier if you’re not comfortable with your hand writing skills.  If you are, then you can always use a fine point sharpie marker.  The sand paper came in handy to make the house a little smoother around the edges.

IMG_5554text

I gave the house two coats of this great color, front and back.

IMG_5555text  IMG_5557text

I used the second color on the edges of the house, which made it look like snow.

IMG_5558text

Using painter’s tape I painted a door.

IMG_5560text2

I outlined the door with black paint using painter’s tape as well and with a red pen, drew a heart for the door knob.  Of course, if you’re more artistic than I am you can add more details to your house.  Just leave enough space for your new address.

IMG_5560text  IMG_5560text3

Using my computer, here are two examples of wording for your moving announcement.  Again you can write it in yourself with a fine point sharpie marker or use rub on letters.

I think this is a unique and fun way to tell your family and friends about your new address.  You can also drill a hole at the top, add a ribbon and make this an ornament or hang it on your wall.

I can’t wait to make some more of these moving announcements once we close on a house, fingers tightly crossed.

Take good care all.

Until next time…