Easy DIY Wonder Woman Headband and Wrist Cuffs using Felt

Hello everybody!

I hope you guys are well.

Since Halloween is just around the corner here’s a quick DIY costume accessories idea for Wonder Woman.

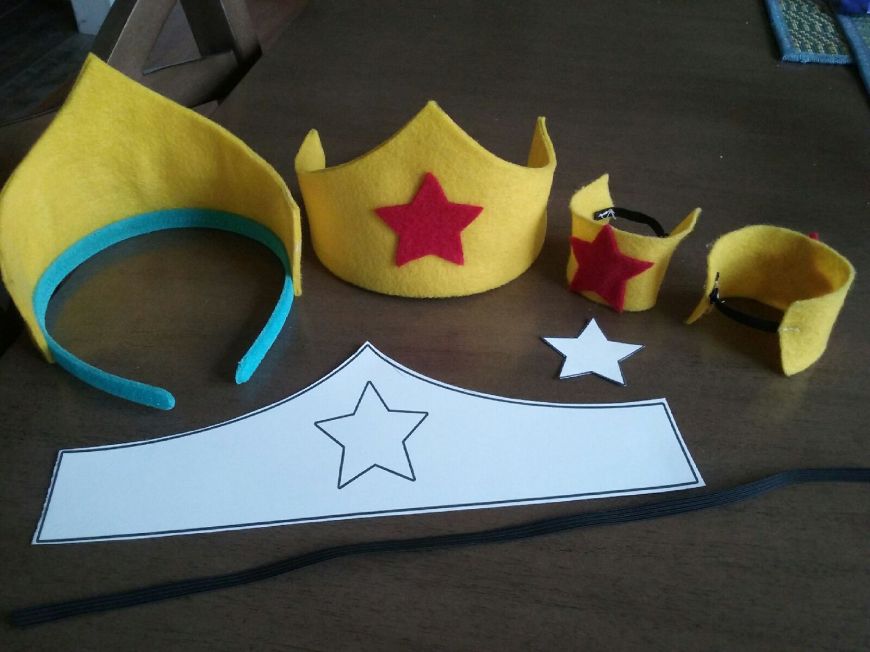
20161026_143526I made these headpieces and wrist cuffs for my daughters who wanted something simple to wear on Superhero day at their school. They wore a plain blue shirt and jeans so the accessories would pop out more.  They didn’t want to do the typical cape and mask thing so I found a good template online for Wonder Woman’s headband and got to work.

Using the template to get the design, I folded the felt in half to make it sturdier with two layers of felt as oppose to just a single layer.  I glued the headpiece at the edges with some tacky glue and then made the stars with a template and red felt.  I then glued the headpiece onto the plain headband.  The tacky glue doesn’t dry instantly so I used large paperclips to secure the felt onto the headband until it dried.  It worked like a charm.  For the wrist cuffs I simply cut out a long rectangular piece from the yellow felt and split it in half.  I then glued the stars in the middle and sewed on a small piece of elastic so they could slide it onto their wrist and have fun pretending to be Wonder Woman, which they did.  

I hope you like this idea!

Take good care all.

Until next time…

Happy Belated Halloween 2013

Hello everybody!

I hope you guys are well.

This year for Halloween the Mercado household dressed up as…

IMG_5982text

…Princess Peach, Mario, Luigi, and Yoshi from Super Mario Brothers

IMG_5988text IMG_5992text IMG_6006text

I so wanted to recreate that picture above with the stuff toys, but a certain little girl/Yoshi didn’t want to cooperate and get into the costume my talented husband created, so we went Yoshiless.  My oldest daughter, Olivia, was Princess Peach (costume gown and crown bought early at Target.com), my husband was Mario and I, as you can see, turned into Luigi.  I couldn’t smile comfortably with that darn moustache on my face.  🙂

We bought the white gloves, blue suspenders, and moustaches at Party City.  I ordered a set of Mario and Luigi hats through Amazon, but unfortunately they didn’t arrive on time so I took matters into my own hands…

CAM00222text

I took hats that we already owned and using felt, tape, glue, safety pins and a sewing needle I transformed them temporarily.

IMG_6013text

This idea popped into my head the day before Halloween so I had to hustle in order to have them ready for pics and trick or treating, which only my husband did with my oldest ’cause turns out my youngest was running a fever that night and I had to stay home with her.  That’s why she was refusing to cooperate.  She wasn’t feeling well.  😦  I was able to put a costume on her in the morning when we took her sister to school.  At that time she was okay.

sophiaflowerfairy2013text

My little forest fairy!

Several days later I was able to make Yoshi come to life…

IMG_6007text  IMG_6011text IMG_6017text

…here’s Sophia in a homemade Yoshi costume.

My husband purchased a green t-shirt and felt (white, red, orange, and green) at A.C. Moore craft store.  He made the shell using red and white felt and sewed it together.  He stuffed it with polyester fiberfill (Sophia can use it later as a small pillow).  In front of the shirt, he sewed a white felt circle and then attached/sewed the shell in the back of the shirt.  He constructed the head-piece on his own, using green, orange, and white felt.  He drew the eyes and nostrils with a sharpie marker and to make the nose prominent he used a little of the fiberfill and sewed it up.  There you go, it’s Yoshi from Super Mario Brothers!

I hope your Halloween for 2013 was fun and safe.

Take good care all.

Until next time…

Bats, Banners, and Door Monsters…Oh My!

Hello everybody!

I hope you guys are well.

October has definitely rolled in and I’ve been busy decorating my home for Halloween.  I try to put things up in the night while the girls are asleep so in the morning they’ll have a spooky surprise.  We’ve also been brain storming on how we’re going to put together our family costumes because we’ve chosen a group theme this year.  So far, my oldest daughter is the only one who has her costume already (bought it online a while back).  I just need to buy some white, long, satin gloves and take some major wrinkles out of her dress…that’s all the hints you’re going to get.  🙂

Here’s a look at some of my Halloween decorations either taken out of storage or recreated:

IMG_5931text IMG_5932text

IMG_5941text

I had some bats stored away, but since I like them so much I decided to make some more.  I simply used a bat template, printed on cardstock, and then traced with a pencil on black construction and cardstock paper.  I taped them up on several walls in my living room as well as the entry wall.  As soon as you walk in your eyes simply get drawn to them.

IMG_5939text

I made this pennant banner last year!  I placed it in the hallway outside my front door.

IMG_5938text   IMG_5943text

I went to the craft store and found these small foam cutouts, in packs of five, and just taped them up in my living room.

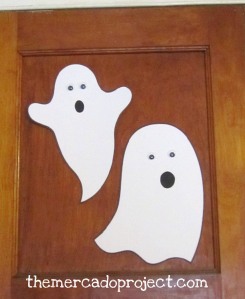
I searched for ghost templates and printed these cuties out on cardstock and just added googly eyes.

IMG_5933text   IMG_5936text

And last, but not least, my door monsters.  Last year, I was inspired by a picture on Pinterest and decided to make my own.  This year, I decided to make two of them.  One on the door in my living room and another on the small closet door in my office space/playroom.  I used party streamer paper and paper plates for both monsters.  My girls absolutely love these guys and so do I.

Happy decorating!

Take good care all.

Until next time…

DIY DOOR MONSTER DECORATION FOR HALLOWEEN

Hi everybody! I hope you guys are well.  I had a great surprise for my daughters yesterday.  While my oldest was at school and my youngest was taking her nap, I had time to decorate the door in our living room for Halloween.

Inspired by a pin on www.pinterest.com,

I made our own door monster.

I know he’s supposed to be scary, but I think he’s adorable.  I used blue and white party streamers for the hair, eyebrows and mouth, two disposable plates and a sharpie marker for the eyes, and tape to hold everything up.  I might add some red to our monster so he can be a Giants fan just like us!

When my daughters saw this, my oldest couldn’t stop smiling and my youngest, who’s such a character already at just 2 years old, turned around and ran screaming.  She was pretending to be scared! 🙂 She came back smiling and couldn’t stop looking at the door.  This was a quick, easy and fun decoration to do.

This morning, as my youngest was staring at the door again, I told her  “We should give him a name.”

She replied, “Monster.”

Good enough for me!

Take care all.  Until next time…

DIY Word Girl and Captain Huggy Face Costume Halloween 2011

Hello everybody!  I hope you guys are well.  I’m posting this early just in case someone wants an idea on how to make a Word Girl costume for their child.  Last year we asked our daughter, “What do you want to be for Halloween?”  She said, “Word Girl!”  At the time, she had discovered this cartoon character featured on channel 13 (PBS Kids), and that’s what she wanted to be.  I searched for costumes online and found some that were made already, but their biggest size was a 4T and I usually like to buy a size bigger for my daughter.  I also found pictures of DIY Word Girl costumes and I thought, “Well, if they did it.  Why can’t we?”   

Here’s the clip art I used for inspiration and to make sure we had everything covered:

This is Word Girl and her trusty sidekick, Captain Huggy Face as seen on channel 13 (PBS Kids)


My daughter, Olivia, as Word Girl with her trusty sidekick Captain Huggy Face 🙂

Here’s the breakdown:

Red long sleeve turtleneck – Old Navy (I couldn’t find a crew neck shirt, but since it was chilly outside the turtleneck was ok)

Red leggings – K-Mart

Shiny, yellow fabric – Lady Jane craft store (absolutely PERFECT for the cape, cut to size and we used a button for closure)

Plush monkey – www.toysrus.com

Red, yellow, and blue felt, yellow and brown craft foam, black pipe cleaner, and white pom-pom ball – A. C. Moore

Black boots – Already had

Between my husband and me, he sews the neatest and is not afraid to tackle something new so he made both CAPS using red felt.  He didn’t use a template or pattern.  Just measured my daughter’s head, cut the felt, and sewed it up!

I used the yellow felt and a template to cut out the STAR and my husband sewed it unto the shirt.

I made the BELTS with the craft foam and used Velcro with double-sided tape to open and close.

I made Captain Huggy Face’s pants and shirt.  I didn’t use a pattern or template.  Just sort of measured the felt on the monkey’s body and started sewing away.  Unfortunately, this method resulted in the shirt coming out really small, but lucky for me stuff toys can be squished.  I squeezed him into that shirt because I wasn’t going to make another one.

For the antennae on the monkey’s cap, we used a black pipe cleaner and affixed a small, white pom-pom ball on top.

I was trying to find some red or burgundy leg warmers to put over my daughter’s black boots, but I couldn’t find any.

I was a little worried that people wouldn’t know who she was dressed up as, but I was worrying for no reason.  After they came back from trick or treating, my husband told me that every kid who saw her shouted, “Word Girl!” and my daughter couldn’t stop smiling.  There were even mothers asking, “Where did you get the costume?” at which my husband proudly proclaimed, “We made it ourselves!” 🙂 We had a great time putting this costume together and my daughter’s face, every time another piece came together and she saw herself transforming into Word Girl, was very enjoyable.


We also went to a Halloween party a few days before and my husband and I dressed up as pirates, which we bought at Party City.  I had to make some alterations to my costume because the skirt was too long so I shortened it and the sleeves were too wide so I took them in.  My youngest was a daisy flower, but she fussed nonstop with her costume.

For this year, I’m not too sure if we’re dressing up.  I’m still thinking about that.  I’m looking for something simple for my youngest.  As for my oldest daughter, the costume has been store bought already because she wants to be…stay tuned! 🙂

Take care all.  Until next time…