Easy DIY Wonder Woman Headband and Wrist Cuffs using Felt

Hello everybody!

I hope you guys are well.

Since Halloween is just around the corner here’s a quick DIY costume accessories idea for Wonder Woman.

20161026_143526I made these headpieces and wrist cuffs for my daughters who wanted something simple to wear on Superhero day at their school. They wore a plain blue shirt and jeans so the accessories would pop out more.  They didn’t want to do the typical cape and mask thing so I found a good template online for Wonder Woman’s headband and got to work.

Using the template to get the design, I folded the felt in half to make it sturdier with two layers of felt as oppose to just a single layer.  I glued the headpiece at the edges with some tacky glue and then made the stars with a template and red felt.  I then glued the headpiece onto the plain headband.  The tacky glue doesn’t dry instantly so I used large paperclips to secure the felt onto the headband until it dried.  It worked like a charm.  For the wrist cuffs I simply cut out a long rectangular piece from the yellow felt and split it in half.  I then glued the stars in the middle and sewed on a small piece of elastic so they could slide it onto their wrist and have fun pretending to be Wonder Woman, which they did.  

I hope you like this idea!

Take good care all.

Until next time…

Crazy Hair Day

Hello everybody!

I hope you guys are well.

Last week we celebrated all things great of Dr. Seuss with book readings, poems, and special activities that included wearing a hat to school (crazy or favorite), Dr. Seuss colors (black, white, and red), pajamas, and our favorite, crazy hair.  Of course, my daughters were super excited, especially my young one because it was going to be her very first crazy hair day at school.

I wanted to do something special, but keep things simple at the same time.  This is what we came up with:

crazy hair day 2                crazy hair day 1

We decided to turn a hair bun into a birdie’s nest by taking brown, tan, and green pipe cleaners and twisting them around the bun so they could look like twigs and leaves.  Then we stuck several feathers in and last but definitely not least, the main attraction was these little paper birdies that we found at AC Moore craft store.  It was easy to attach the birds onto the bun because the birds already had a metal hair clip.

Of course, these buns can be decorated more and taken to another level, but like I said before, I wanted to keep things simple.  My girls were super happy with the results (mission accomplish!) and ready to participate in crazy hair day.

Take this idea and let your imagination and creativity fly!

Take good care all.

Until next time…

Happy Valentine’s Day!

Hello everybody!

I hope you guys are well.

Valentine’s Day is fast approaching and at my daughter’s school they did something pretty cool this year.  They wanted their students to decorate and bring in a valentine holder for their valentine cards and treats.

My kindergartener and I decided to decorate an empty graze snack box (graze.com) because it was already partially decorated for Valentine’s Day (red hearts) and it was the perfect size to transform into a purse/clutch valentine holder! 🙂

We just added my daughter’s name in the front (covering the graze name) along with some 3D valentine stickers

and glued a piece of purple construction paper in the back and decorated it with a variety of stickers.

Back

I secured the box with a little bit of clear tape and made a slot, which we decorated with a fabric, flower ribbon, for the valentine cards and treats to go in.

We recycled the clear plastic backing, which you can probably see in the first 2 pics, of the glitter tape decoration that we placed around the box (not shown in the pics) for the purse strap.  I then showed my daughter how she could hold the box two ways:  as a clutch with her hand or a shoulder purse with the strap.  The giddiness that ensued after transforming that box into her valentine holder will stay with me forever. 🙂

As for my third grader, she had a vision and it involved one of her favorite cartoon characters, SpongeBob Squarepants.  She loves that little dude!

She didn’t want to do plain, old SpongeBob though.  No, she wanted to make SpongeBob in his Kuddly Krab work uniform.   This uniform is featured in the episode titled “Bossy Boots.”

We printed out some pics of SpongeBob wearing the uniform so we could easily reference it.

I also made a template of the purple flower design that’s on the uniform so my daughter could easily trace, cut, and glue the design onto the box.

The materials we used were a cereal box, construction paper (pink, yellow, purple, white, and neon green card stock paper), and pipe cleaners.  We also printed out a small spatula and a “Krabby Patty,” which we taped onto his hands.


From a cereal box to “Kuddly Krab SpongeBob Squarepants!”


Here’s the breakdown: We gift wrapped the box with pink construction paper using tape and glue.  My daughter traced a big circle out of yellow construction paper for his face and two small circles for his eyes with white paper as well as two little squares for his front teeth.  She then drew the details herself.  She used the template for the purple flower designs and we glued those down as well as his face.  The pipe cleaners were used to make the antennas, arms, legs, socks, and shoes.  She wanted to place two pink hearts on the antennas instead of the red K’s.  For his yellow hands I copy and pasted a picture of SpongeBob and cropped the pic until his hands were the only things on the screen, then printed and glued onto the pipe cleaner.  We did the image two sided so it was easier to glue.  A slot at the top of the box ensures that valentine cards and treats will go in nicely!

There you have it!

HAPPY VALENTINE’S DAY EVERYONE!

Take good care all.

Until next time…

Remember me?

Hello everybody!

Remember me?

Probably not, but that’s okay because it’s my fault.

Let me re-introduce myself. I’m Angelica and I hope you guys are doing well.

A lot has happened since my last post, which was back in April of this year.

Here’s the rundown:


1. My sister and her fiancé announced they were expecting their first child!!!

DSCN0341croppedandtext

Congrats Dave and Monchie!!

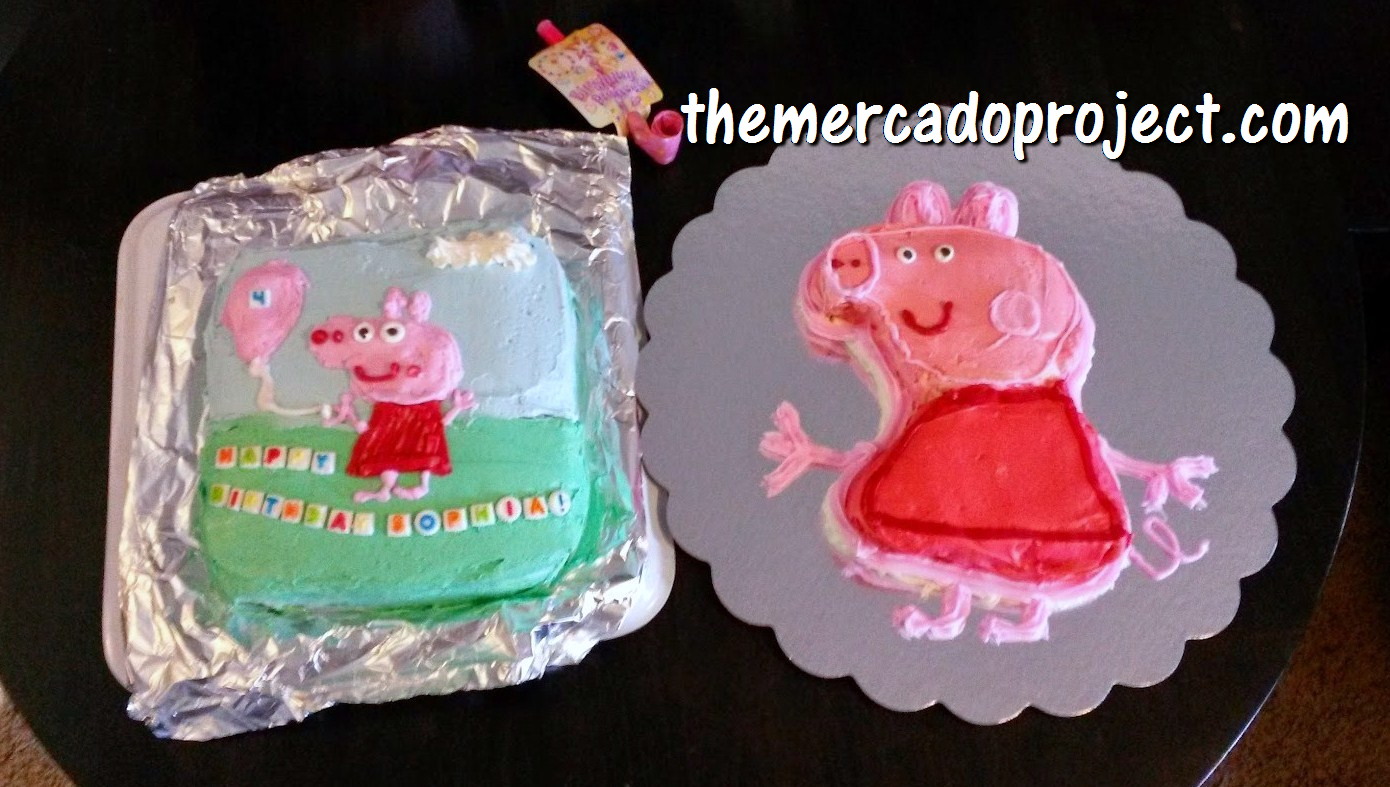
2. My youngest daughter turned 4 years old and we had a party at the bowling alley! The theme was Peppa Pig and my husband made her TWO cakes! Yes, my hubby made those cakes you see below!

CAM00754text     20140412_093742text

   20140412_100818text

Two Peppa Pig cakes

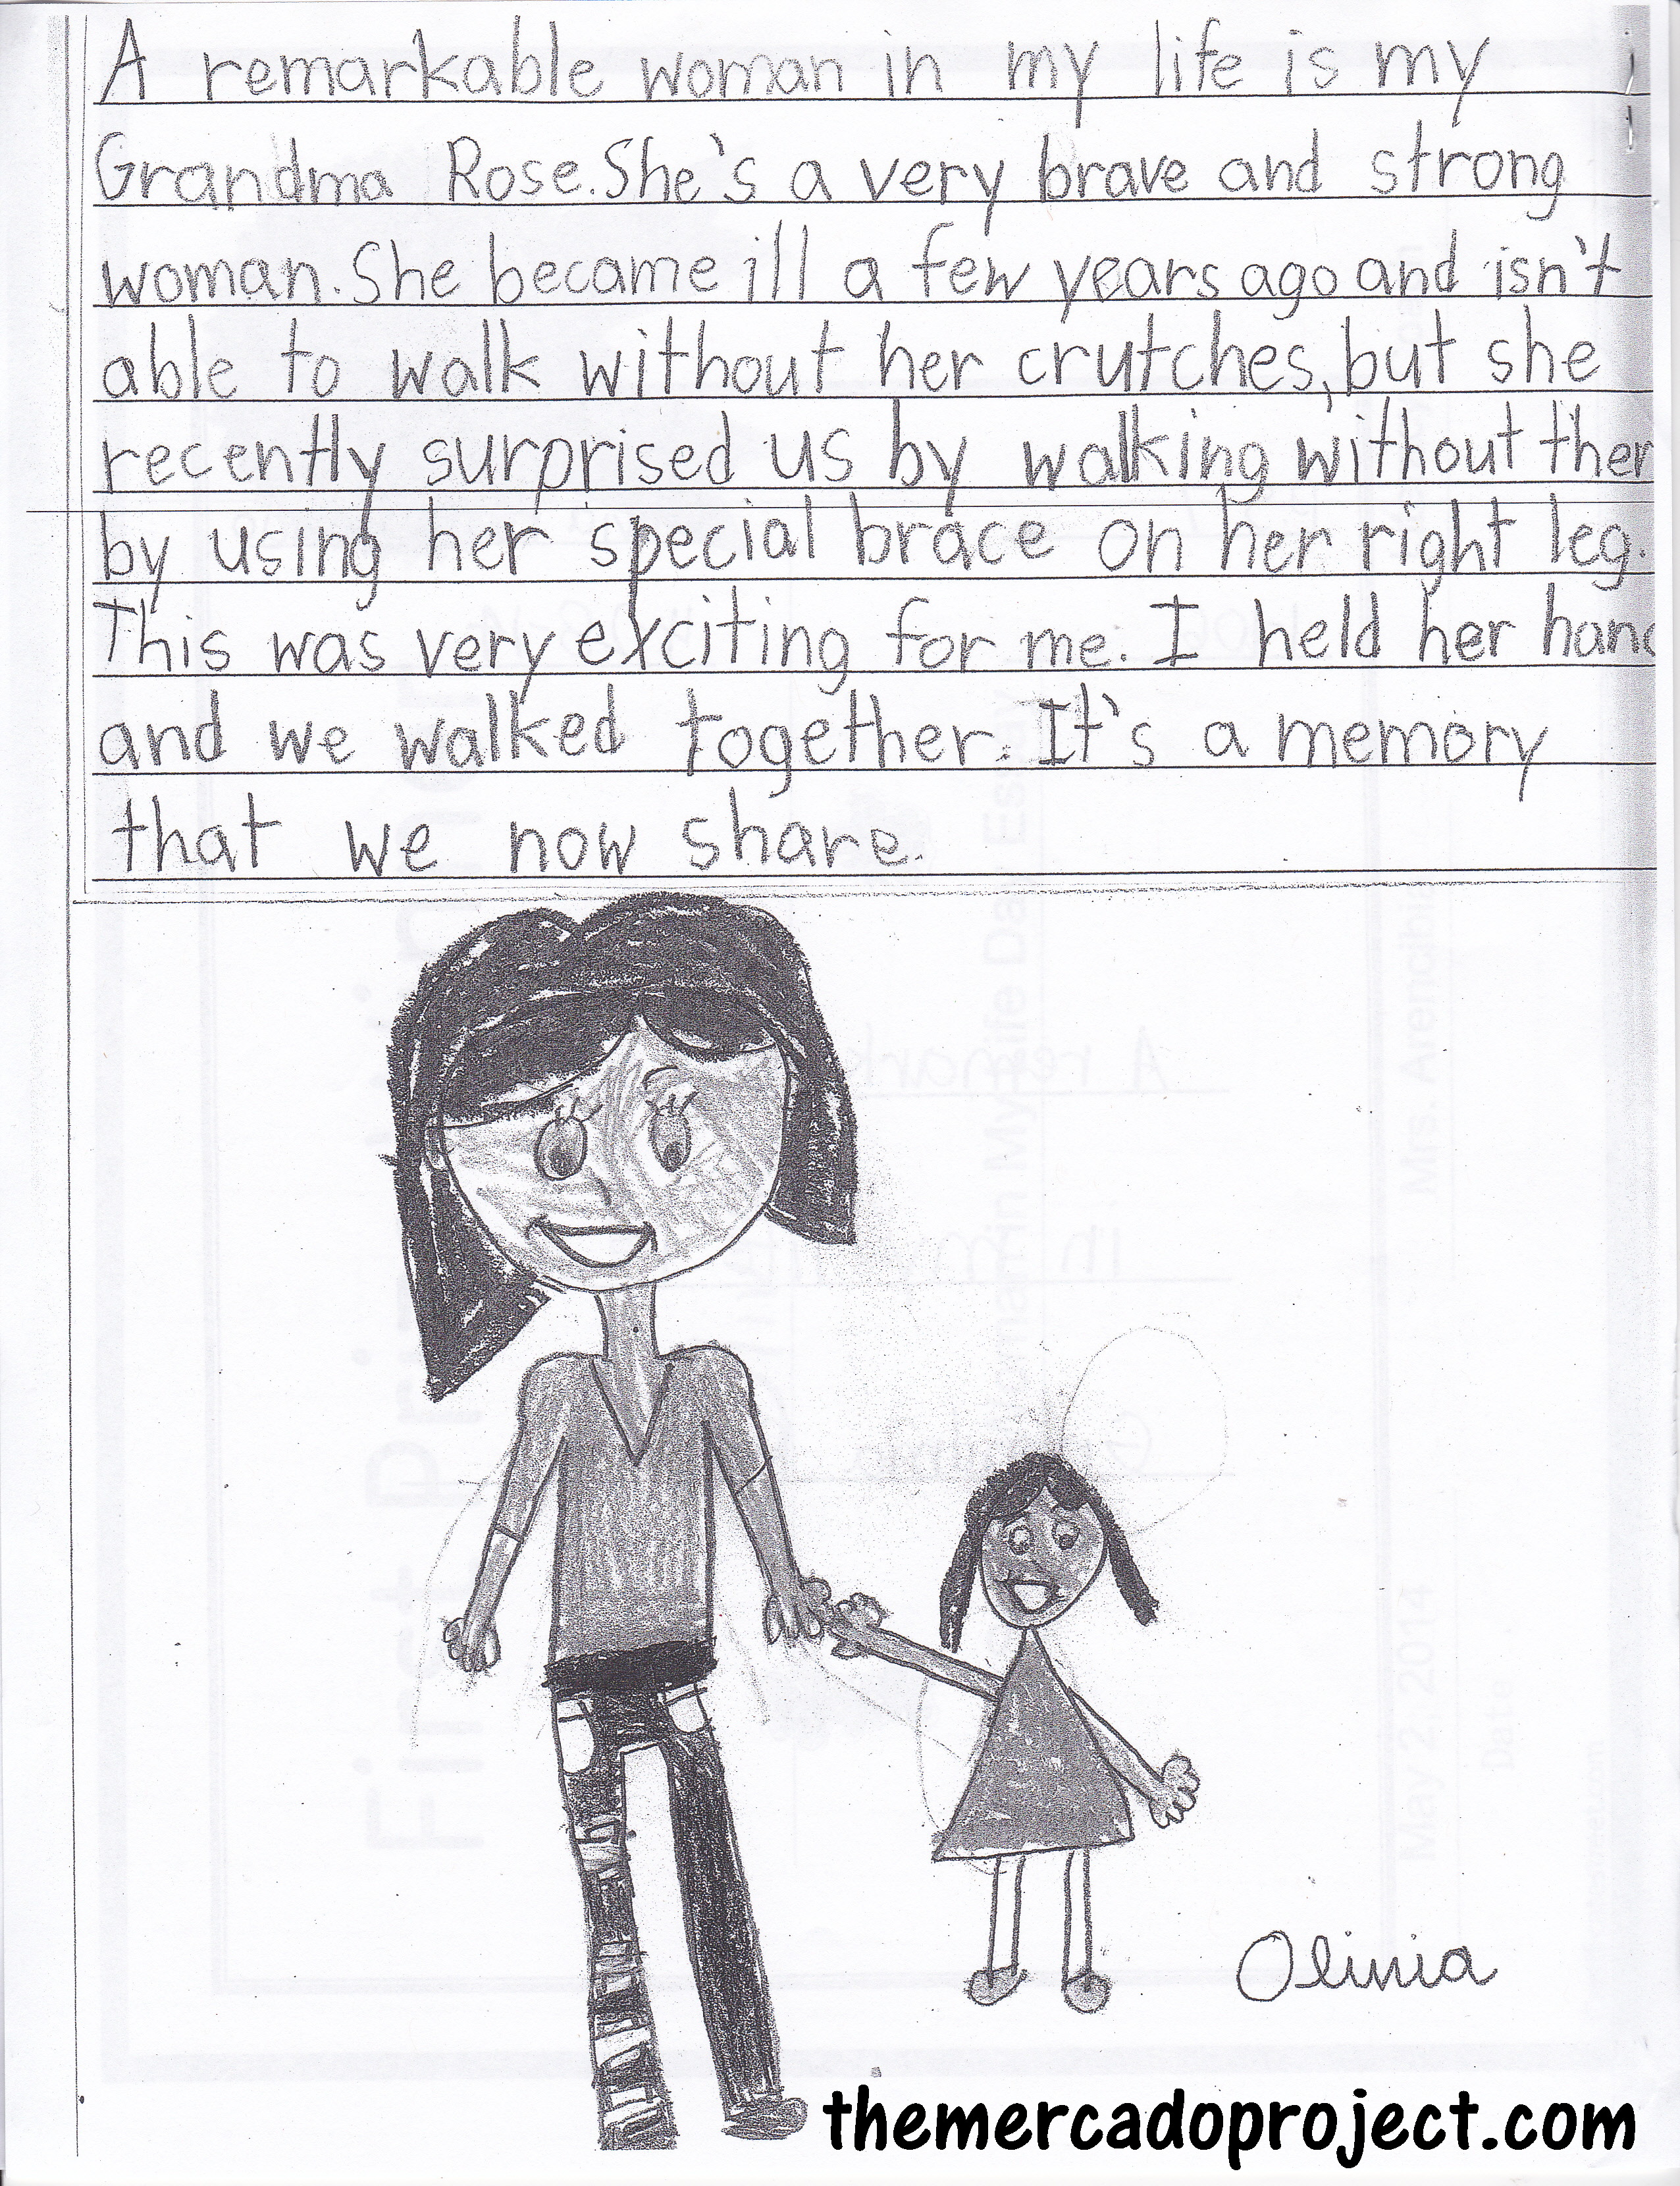
3. My daughter received a certificate in her school for writing an essay on the most special woman in her life. She chose to write about her Grandma Rose (my mom, Rosa).

IMGtext

The essay read:  A remarkable woman in my life is my Grandma Rose.  She’s a very brave and strong woman.  She became ill a few years ago and isn’t able to walk without her crutches, but she recently surprised us by walking without them by using her special brace on her right leg.   This was very exciting for me.  I held her hand and we walked together.  It’s a memory that we now share.

(That’s a black and white copy of the original above.  My daughter drew the picture and asked my mom if she could send her a picture of her wearing the brace so she could draw it.  My daughter gave my mom the original for Mother’s Day.)

4. My oldest daughter turned 7 years old and we had another party at the same bowling alley! The theme was the Minions from the movie, “Despicable Me” and this time around the cake was store bought (yeah, we got lazy, but the cake was still yummy).

SAMSUNG CAMERA PICTURES      SAMSUNG CAMERA PICTURES

The birthday girl and her Minion cake!

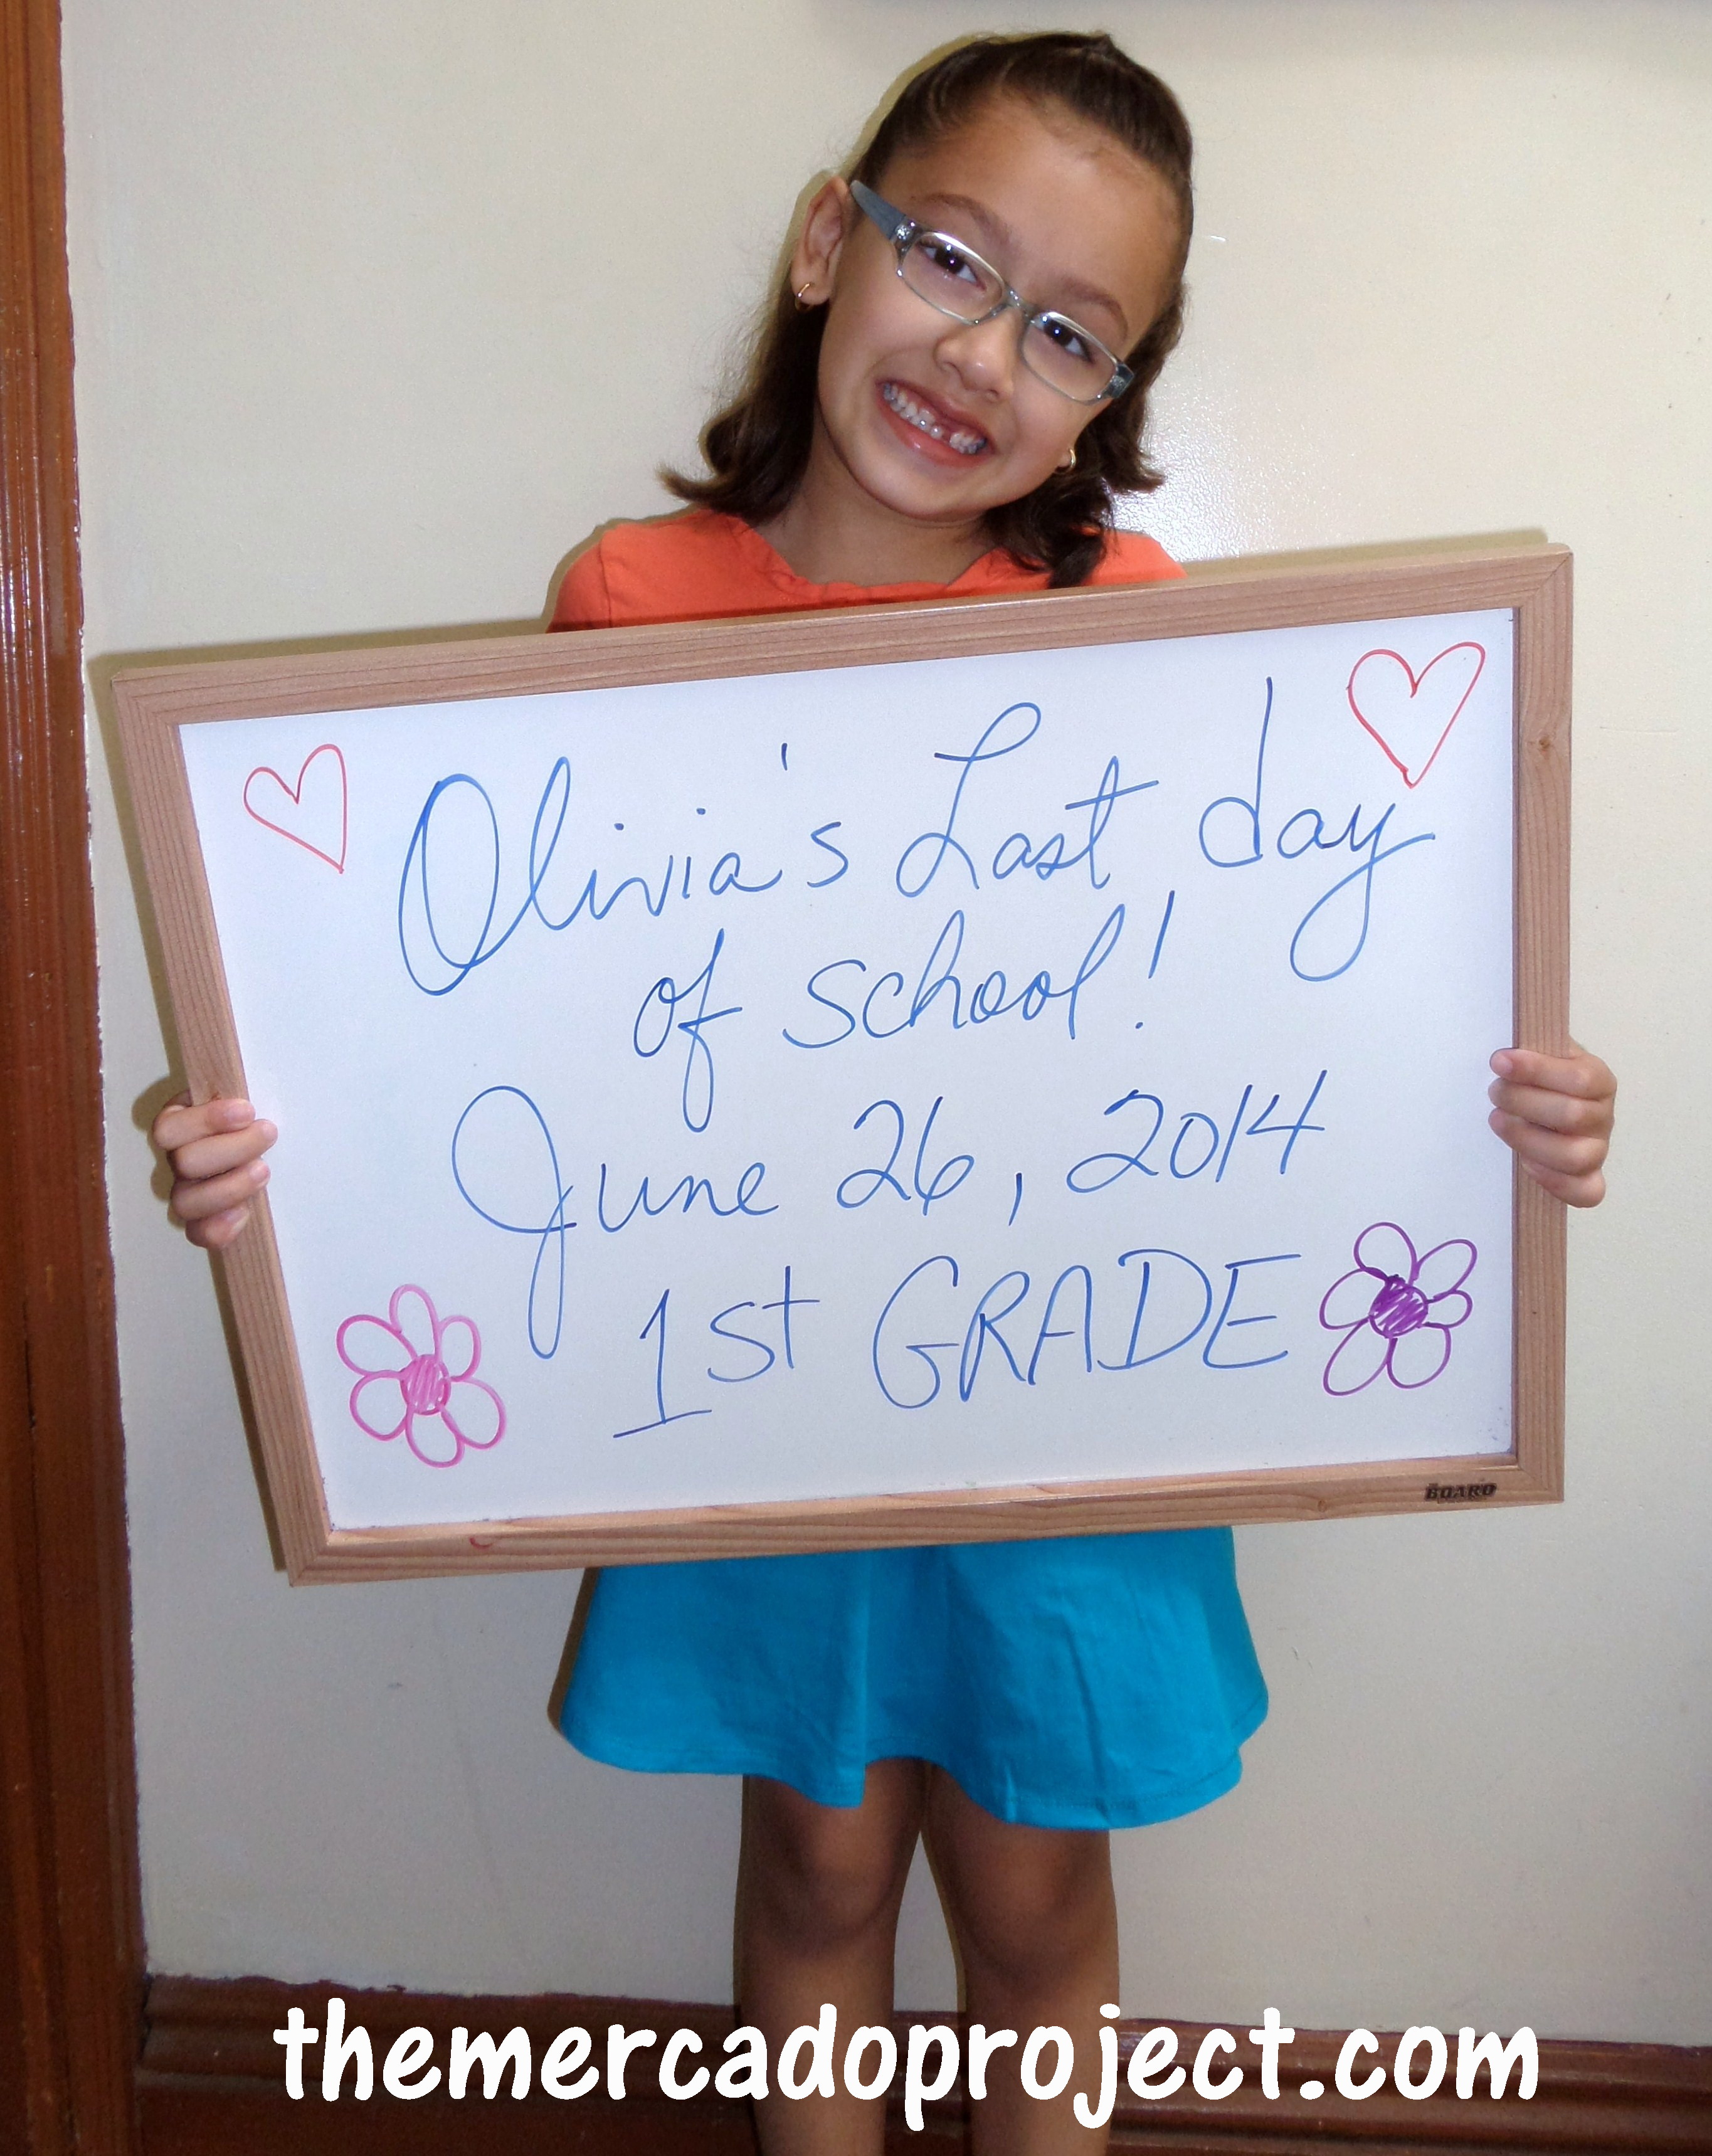
5. My daughter successfully completed the first grade!

SAMSUNG CAMERA PICTURES

Summer vacation begins!

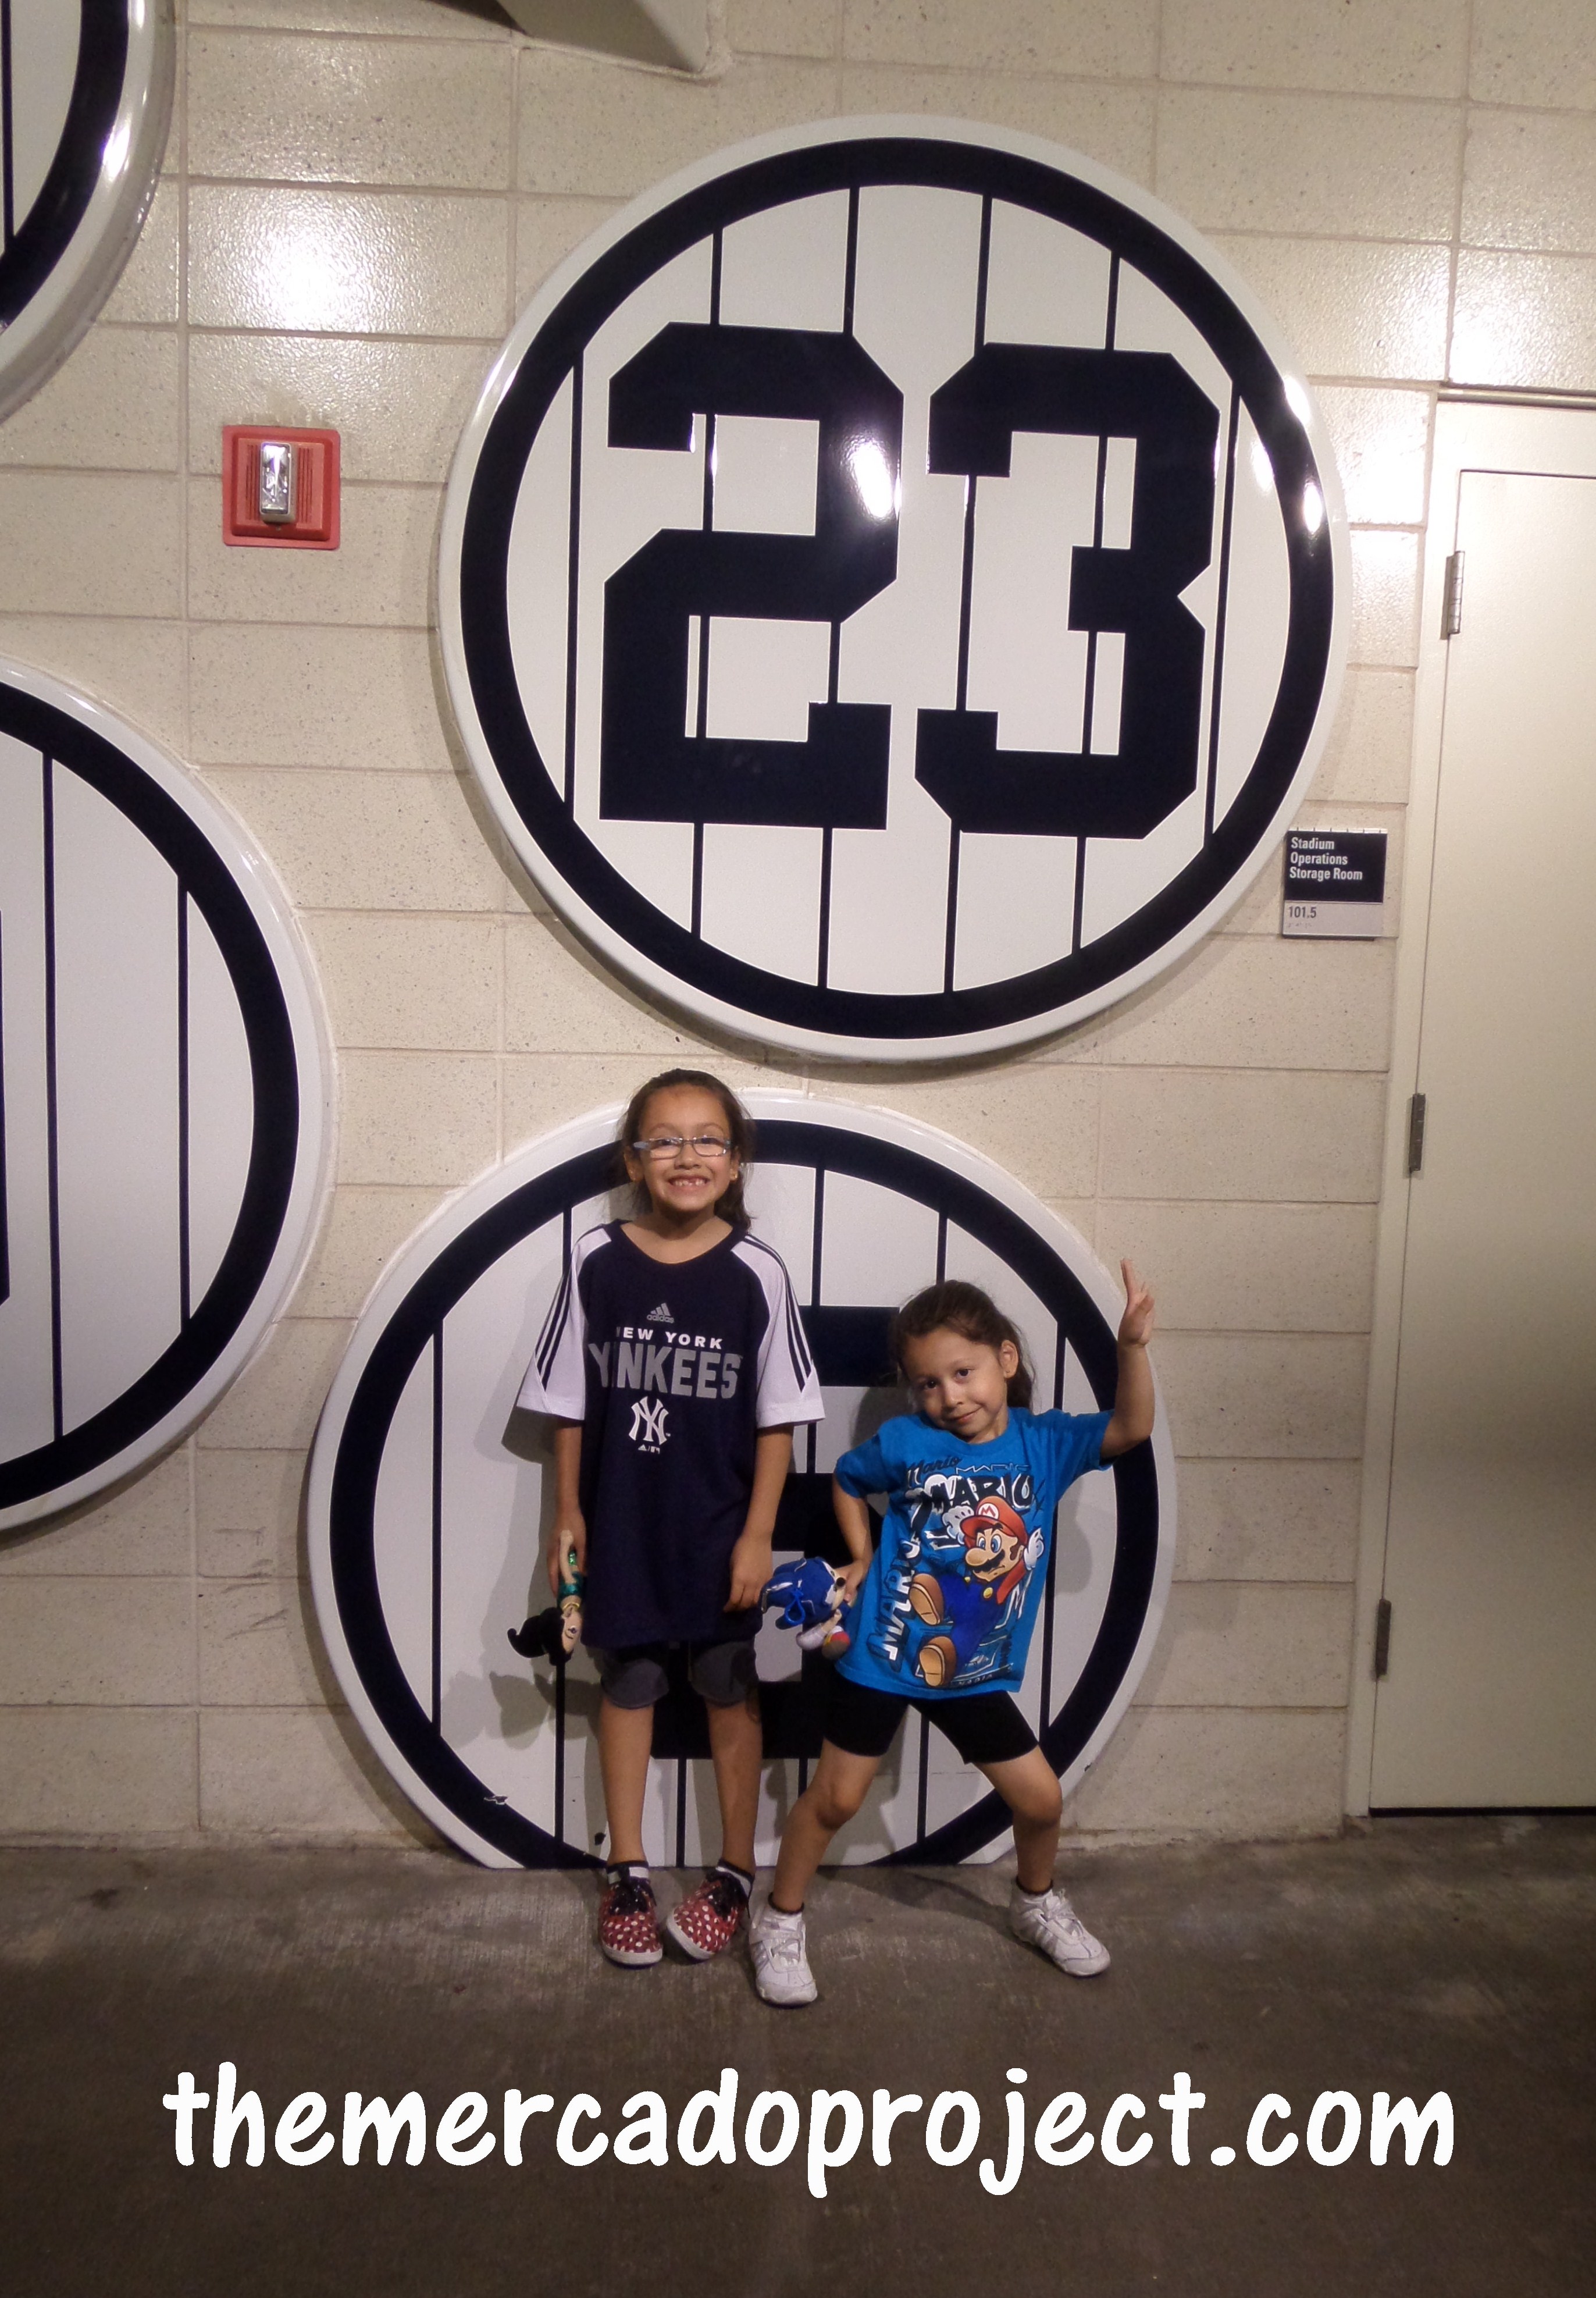
6. We went to see the New York Yankees play against the Toronto Blue Jays!

SAMSUNG CAMERA PICTURES

My youngest strikes up the funniest poses! 🙂

7. We went on vacation for a week with family to a Pocono resort, The Villas at Tree Tops. We had a lot of fun and great memories were created.

SAMSUNG CAMERA PICTURES

8. Final days of the summer were spent going to the library and spending time with family, then it was back to school!

SAMSUNG CAMERA PICTURES

My oldest entered the second grade and I’m keeping my youngest with me at home, even though she can enter Pre-K, but I’ll rather have that time teaching her myself and having fun together before she officially goes off to school next year.

So that’s the recap and there are so many things in the horizon, for example, we’re preparing to move (yikes, more on that later on), a Halloween themed baby shower as well as a destination wedding next year in beautiful Puerto Rico. Oh boy! or girl…it’s a surprise, due in November. We can’t wait and I hope to be a better blogger!

Take good care all.

Until next time…


It’s that time of the year…let’s dye some eggs!

Hello everybody!

I hope you guys are well.

Easter’s fast approaching and the dyeing of the eggs has come upon us.  While my girls were being distracted/entertained by the television, I quickly set up everything we needed in the kitchen.

eastereggs2014text

eastereggs20142text        eastereggs20143text

I got the PAAS Egg Decorating kit in Marble Magic.  This kit included 16 egg stands, 6 dye tablets, 2 egg dippers, 2 packets of gloss and 1 polishing fabric.  I also got the Color Cups and that came with 5 dye tablets, 1 egg dipper, and a magic crayon.

eastereggs20144text

Instead of mixing the tablets with just water, I added a tablespoon of vinegar to half a cup of water so the eggs would dye brighter in color.  I also taped down a small, white recycle garbage bag on my girls picnic table so clean up would be easier and there would be no staining on the table.

eastereggs20145text

Even though my little one was not feeling well, she still had fun, as well as my oldest.  The toothless smile says it all.  🙂

eastereggs20146text       eastereggs20147text

In order to get the marble effect you had to add a tablespoon of oil to the color mixture.  We also used the magic crayon to make designs before dunking the eggs in.  Whatever was marked with the crayon, didn’t dye with color (my youngest drew lines on the purple egg while my oldest drew circles on the pink egg).

eastereggs20148text

We used the gloss and fabric to get the glossy effect.

My oldest daughter’s favorite egg is the very first one: the purple and aqua blue marbled egg

Egg dyeing mission for 2014: Successful

Next mission: Filling up plastic eggs for the Easter egg hunt

Take good care all.

Until next time…


DIY Peppa Pig Birthday Banner

Hello everybody!

I hope you guys are well.

My youngest daughter turned 4 years old this past Saturday.  I wish I could have captured on camera how her morning, sleepy face transformed into sheer happiness upon hearing us say, “Happy Birthday Sophia!”  It was magical and so sweet.  I did take a ton of pictures after we got all dressed up, but I have to sort through them first.  For this post, I wanted to share with you how I made her a Peppa Pig birthday banner.

Enjoy!

CAM00734-1text

CAM00738text CAM00739text CAM00750text

This banner was super easy to make and didn’t take long.  I found the banner template online.  I had foam flower cut outs saved from a great find at the dollar section in Target.  I did the happy, birthday, and letter circles myself on Word, then glued everything together and strung it up with pink ribbon.

I absolutely loved how this banner came out and my daughter loved seeing it up on the wall.  The theme was Peppa Pig and she loved seeing all the different pictures of Peppa Pig.

More pictures to come.

Take good care all.

Until next time…

April Fool’s Brownies

Hello everybody!

I hope you guys are well.

Happy April Fool’s Day!  My oldest daughter, Olivia, woke up today super excited because it’s April Fool’s Day and she really wants to pull a prank on someone.  That someone is her dad so I went on Pinterest and searched for silly pranks.  There was one in particular that was cute, simple to do and silly enough for a six-year-old to enjoy.

So we’re baking a batch of brownies for dear old dad, oh wait did I just say/write baking brownies.  No, what I meant was we’re making brown E’s for unsuspecting, dear old dad.  Check it out:

IMG_6468text     IMG_6470textIMG_6471text      IMG_6473text

I left some E’s for Olivia to cut out once she got home from school, then we put a book inside the baking pan (so it could feel heavy), placed all the E’s inside, and closed it up with aluminum foil.

I even put it inside the oven, which prompted my youngest to say, “Oh no, the E’s are going to get hot,” even though I didn’t turn it on.  🙂

Needless to say, once my husband got home from work, the girls couldn’t contain themselves.  Sophia kept shouting, “April Fool’s Day!” so I quickly told my husband to sit down ’cause we made him some brownies before our prank was revealed.

We brought the pan of brownies and told him to uncover the pan completely.

The result:

My husband was surprised and happy with the brown E’s, but then really sad ’cause there wasn’t any real brownies. 🙂

Happy April Fool’s Day everyone!

Take good care all.

Until next time…


A birthday cake mini poster/card

Hello everybody!

I hope you guys are well.

It’s always great to celebrate someone’s birthday and giving something uniquely handmade is especially exciting.  That’s why I loved this idea from Melanie Blodgett over at youaremyfave.com (one of my favorite blogs).

Check out her idea…

http://www.youaremyfave.com/2014/02/17/a-birthday-cake-you-can-send-in-the-mail-is-my-fave/

…and now take a look at my version/attempt.

IMG_6400text

I made this mini poster/card for my mother’s birthday.  I used acrylic paint, paper (about 11 x 14), and paintbrushes.  After the paint was all dry, I rolled up the paper and tied it with a ribbon and presented it to my mom, who absolutely loved her cake plus the fact that it only had 25 candles.  🙂

Thanks Melanie for the great idea!

Take good care all.

Until next time…

Butter Scotch candy + Funfetti Cupcakes = Yumminess!

Hello everybody!

I hope you guys are well.

I made funfetti cupcakes with butter scotch candy toppers for Valentine’s Day for my family.  It’s semi-homemade, of course, but here’s what I did:

IMG_6379text

Combine ingredients for cake mix and add sprinkles.

IMG_6382text

While the cupcakes are baking, melt butter scotch candy (found this at AC Moore craft store) in your microwave and fill candy mold.  Place into freezer for about ten minutes.

IMG_6386text

I also melted Dolci Frutta chocolate and placed a dollop on each cupcake, then stuck one of the candies on top and placed into the refrigerator for a few minutes so the chocolate could harden.

IMG_6389text

My valentine cupcakes, but you can always make these for any day.

Take good care all.

Until next time…

DIY PERSONAL PIZZAS

Hello everybody!

I hope you guys are well.

We had a snowstorm yesterday and today’s temperature outside is 8 degrees.  Yup, eight!  So, we did the most logical thing and stayed home.

With both my girls running around and enjoying their time together, I decided to make personal pizzas for lunch.

IMG_6331text

Marinara sauce, wheat flatbread, and shredded mozzarella cheese

That’s all you need for a cheesy pizza.

IMG_6333text       IMG_6339text

375 degrees in the oven for 7 – 8 minutes

Bon appétit

IMG_6344text     IMG_6345text

Of course, you can always add other stuff.

This was my pizza.  I added green pepper, chopped onion flakes, and garlic powder before putting it into the oven.

What do you like on your pizza?

Take good care all.

Until next time…