DIY CHOCOLATE LOLLIPOPS

Hello everybody! I hope you guys are well.  I am pretty well-known in my family to do chocolate lollipops with the help of candy molds.  I have a “small” collection of candy molds and I used to make them a lot for family and friends before I had kids.  Now, I make them once and awhile.  I decided to surprise my daughter with an after dinner treat.  Check out my process, it’s pretty simple:

PART_1358216518181text

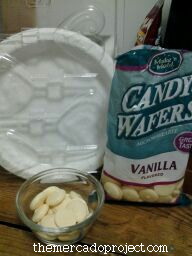
From my collection, I chose a heart-shaped lollipop mold with the word Love scripted in the middle, vanilla chocolate candy wafers, and a small bowl to melt the chocolate in.

IMG_20130114_174147text

I melt my chocolate in the microwave.  Make sure you don’t put it on high or the chocolate will burn.

PART_1358216706197text

With a small spoon, pour the chocolate into the mold.

IMG_20130114_174523text

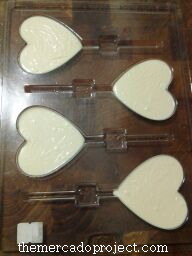
Pick up your mold and tap it against the counter until your chocolate spreads out evenly.

IMG_20130114_174747text

You can add lollipop sticks or not.

IMG_20130114_185217text

Put the candy mold in your freezer for about 10 to 15 minutes.
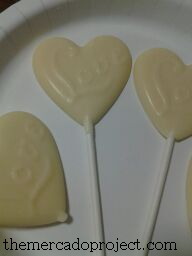
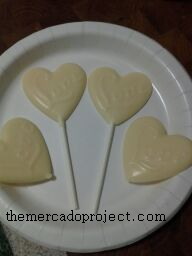
IMG_20130114_185228text

Enjoy!

You can buy candy wafers in different colors.  I’m going to get them in red and using this candy mold make some lollipops for Valentine’s Day.

My sister and I are currently looking for a theme for our brother’s 30th birthday party.  We’re leaning towards a mustache party and while browsing through Pinterest, of course, I came across this:

222928250275072890_QIwecq5f_c

Isn’t that awesome?  I’m definitely going to be on the lookout for this candy mold, just in case.

Take care all.

Until next time…

Mason jar + chocolates = great gift

Hello everybody!  I hope you guys are well.  I wanted to share a gift idea that I put together in order to give several of my closest aunts and cousins.

IMG_3734text

 I bought mason jars at the craft store (A.C. Moore) along with gold ribbon.  The candies I chose are Ghirardelli Chocolate Squares Limited Edition Peppermint Bark (delicious!) and Coconut Malted Milk Balls, which I ordered from www.ohnuts.com.  These are my absolute favorite and they were such a huge hit at my anniversary/renewal party that I decided to gift them again.

IMG_3736text

I made a paper label and tied the gold ribbon around the mason jar.

IMG_3738text

I put the coconut malted milk balls in a clear candy bag just in case they melted and placed 4 peppermint bark squares inside around the mason jar.  I like the way they came out and can’t wait to give them to my family members.  I hope you like this idea.

Take good care all.

Until next time…

DIY IRON ON TRANSFER T-SHIRT

Hello everybody!  I hope you guys are well.  My heart is still quite heavy regarding the tragedy that occurred in Newtown, Connecticut.  I’m a mother of a kindergartener.  I don’t know what I would do.  I do wish everyone love, support, patience, and peace.

I wanted to share with you something that I’ve done as a gift for my father for years now.  The other day he wore a shirt that I had personalized for him using iron on transfer paper and fabric markers.  I made that shirt a looooong time ago and I was so surprised to see that he still had it and that it still looked great.  My mom mentioned to me that he loves wearing the shirts that I make for him, especially the ones with his grand-daughter’s pictures.  She said, “those are his favorite because he gets to show everyone his grandkids!”  Love it!

Here’s my process:

IMG_3608text

I purchased my iron on transfers and t-shirt at A.C. Moore.  The shirt was on sale for $2.99 and with a store coupon, I was able to get the transfers for half off.

IMG_3635text

Choose and print out your picture.  For this particular brand, I had to print my image as a REVERSE IMAGE.

IMG_3641text

You’ll need an iron and I use this piece of wood, specifically for my t-shirts so I just store it away when I’m done, along with a pillowcase.  I place the pillowcase on top of the wood so I can have a hard but smooth surface.  I always do the transfers on the floor so I can press down on the iron.

IMG_3642text

Cut out your design or image and place it on your t-shirt right side up so you can see exactly how it’s going to look.

IMG_3644text

Flip over the paper and center it once again.  I usually like to place the image one finger long down from the neck.

IMG_3646text

PrintWorks instructions: “Iron transfer with firm pressure in a straight, non-stop motion top to bottom and side to side.  Keep iron moving at all times to prevent scorching.”  Make sure your corners are ironed down.

IMG_3648text

Let your t-shirt cool off completely (this part is hard for me because I’m so impatient).  Then carefully peel away the transfer’s backing.

IMG_3652text

I LOVE IT and I hope my dad loves it too.

I hope you guys enjoy this gift and crafting idea.

Take good care.

Until next time…

Personalized Jigsaw Puzzles

Hello everybody!  I hope you guys are well.

IMG_3582text

Here’s the countdown at my house.

My cousin, Janice, sent this little Santa chalkboard to my oldest daughter when she was about 1 or 2 years old, but she wasn’t old enough to grasp the concept so I stored it away.  I found it the other day when we brought out all of our Christmas decorations.  I showed it to Olivia, who’s five now, and explained what it was.  She absolutely loved the chalkboard and the fact that it was going to show her how many days until Christmas.  Thanks cuz!

As for gift ideas for children I absolutely love jigsaw puzzles, especially personalized ones because they can teach your child how to spell their own name.  There are many places where you can get a personalized jigsaw puzzle, but I like the web site www.frecklebox.com.  They have many personalized items (I also love their story books) and I have given many gifts from this website.  Sign up to receive emails so you can get discounts on their merchandise, which is very helpful if you’re on a budget.  Here’s a couple of their puzzles with my daughter’s first and middle name, which I got a long time ago.  They have a glossy finish to them and currently my youngest daughter is having fun putting these together.  I will be getting one with her name soon for Christmas.

IMG_3578text

IMG_3579text

Once my girls are done playing with these I’m going to tape the puzzle together and frame them.

Stay alert, stay alive.

Until next time…

A year round gift

Hello everybody!  I hope you guys are well.  I can vividly remember the first time I gave my mother a custom-made family calendar as a Christmas gift to her.  She started crying!  It was of course tears of joy, but I wasn’t expecting her to cry.  Be overjoyed, yes, but not cry.  Needless to say, she absolutely loved it.  She completely immersed herself into the calendar.  It was as if the world around her suddenly disappeared and it was just her and this gift that she couldn’t wait to see.  I watched her intently.  She paused at each month and you could see her eyes darting here and there, taking in all of the images.  A loving smile would appear on her face and I knew she was looking at pictures of herself with my daughters, her only grandchildren, so far.  A small laugh would escape her when she saw the funny pictures.  I got a few “Oh my gosh,” and when she reached the end of the calendar, she let out a big, “I love it!”  Sweet music to my ears.

There are many places and web sites where you can make a calendar.  So far, I’ve made mine on www.shutterfly.com because they offer great promo codes and free shipping.  The calendars always come out great.  Since I like to include more than one picture, it usually takes me more time to assemble them into place.  Once you’re done and you complete your order, the calendars are on your doorstep fast!  My cousin loves taking her pictures to Wal-Mart and making her calendar there herself!  She’s the one who gave me the idea to give a calendar as a gift because she sends me one every year.  Another tradition that we’re forming and I love putting it on my kitchen wall and looking at my gift year round.

Stay alert, stay alive.

Until next time…

Christmas Tree

Hello everybody!  I hope you guys are well and getting ready for the Christmas countdown.  It has begun and yesterday we put up and decorated our little (four-foot tall) faux tree.  I’m not a big fan of cutting down real trees.  No offense to anyone.  I grew up with reusable ones.  I prefer not to hurt our environment and I like to save some money wherever I can so after I got married I went and bought my very own tree and it’s been serving us well for eleven years.  I might get a bigger one in the future, but for now this tree is perfect because I’m able to situate it high up where my darling two-year old, who loves to touch and doesn’t like to use her listening ears, can’t take any of the ornaments off.  My sweet cousin, Janice, started a tradition a long time ago of sending me an ornament each year so my tree is decorated with those cherished embellishments.  Some are handmade by her using pictures, while others were purchased signifying special moments in my life for example when we were expecting and our children’s birth facts.  I do have a love/hate relationship with decorating the tree.  I love displaying it, but kinda of hate the time it takes to decorate it, even if it’s four-foot tall,  because I can be a little stubborn with where the ornaments have to be specifically placed.  I did give in a lot this year because I didn’t put up all of my ornaments.  I just wanted to finish, fast!  And we did.  So the tree is up, now it’s time to wait for Santa to bring the presents and place them under the Christmas tree, which I take down the night before and place the presents around so my kids think that Santa came to our house.  This year my daughter became aware of placing cookies for Santa so she wants to do that for him.  🙂  It’s cute.  I love it and I hope you guys have fun decorating for the holidays.

IMG_3574text

IMG_3575text

Mercado Christmas Tree 2012

Stay alert, stay alive.

Until next time…

Happy Thanksgiving 2012!

Hello everybody!  I hope you guys are well.  Happy Thanksgiving and we hope you all are able to spend time with family and friends.  A special THANKS to those who are serving in the military and protecting our country.  You’re forever in our thoughts and may you have a safe return back to your families.

My husband who’s a great cook made our Thanksgiving lunch, which is also going to be dinner as well.  We sat around the table, held hands, and gave thanks.  Now there’s football on the television and our bellies are full.  Have a great holiday!

Our traditional Thanksgiving food! It was yummy!

Stay alert, stay alive.

Until next time…

DIY Thanksgiving banner

Hello everybody!  I hope you guys are well.  Here’s a DIY Thanksgiving banner that I came up with.

I used Microsoft Word, a leaf template, cardstock, a wide Thanksgiving print ribbon, and paper clips to make my banner.

A simple, but meaningful banner.

I affixed the leaves onto the ribbon using the paper clips and the ribbon is held by blue painter’s tape, which I love to use because it holds things up and doesn’t damage surfaces.  I hope you like this idea.

Stay alert, stay alive.

Until next time…

DIY: MEET OUR TURKEY

Hello everybody!  I hope you guys are well.  Remember our Halloween door monster.  If you don’t, then here’s a reminder:

I wanted to continue this door decoration idea right into Thanksgiving so our adorable monster has had a major transformation.

Meet Gobble Gobble Mercado!

I think I love him more than my daughters do.  Oh well, he’s simply adorable and I had a blast doing this.  I kept the eyes from the monster and printed out the hat, beak and feet.  I used party streamer paper and found two red strings for the wattle.  I hope this turkey brought a smile to your face.

Stay alert, stay alive.

Until next time…