Classroom Friendly Supplies Pencil Sharpener

pencil-sharpeners

Hello everybody!

I hope you guys are well.

I am so EXCITED about this post because it’s about a pencil sharpener.  Yes, you read that correctly. So, what’s the big deal?  Well, as you know I have two budding artist in my household plus a niece and nephew who love to write and draw as well.  A good sharpener is a must have!  Enter the Classroom Friendly Pencil Sharpener, which I received the opportunity to test out and share my review with you guys.

SAMSUNG CAMERA PICTURES

I chose Firehouse Red, but there are so many other wonderful colors to chose from at http://www.classroomfriendlysupplies.com

SAMSUNG CAMERA PICTURES

Look at how shiny and beautiful it is!

The Classroom Friendly Sharpener is owned and operated by an elementary school teacher so they know first hand how important a good sharpener is.

I followed the instructions provided on the online store website and within seconds had a wonderful sharpened pencil.  Check out my results:

SAMSUNG CAMERA PICTURES

SAMSUNG CAMERA PICTURES

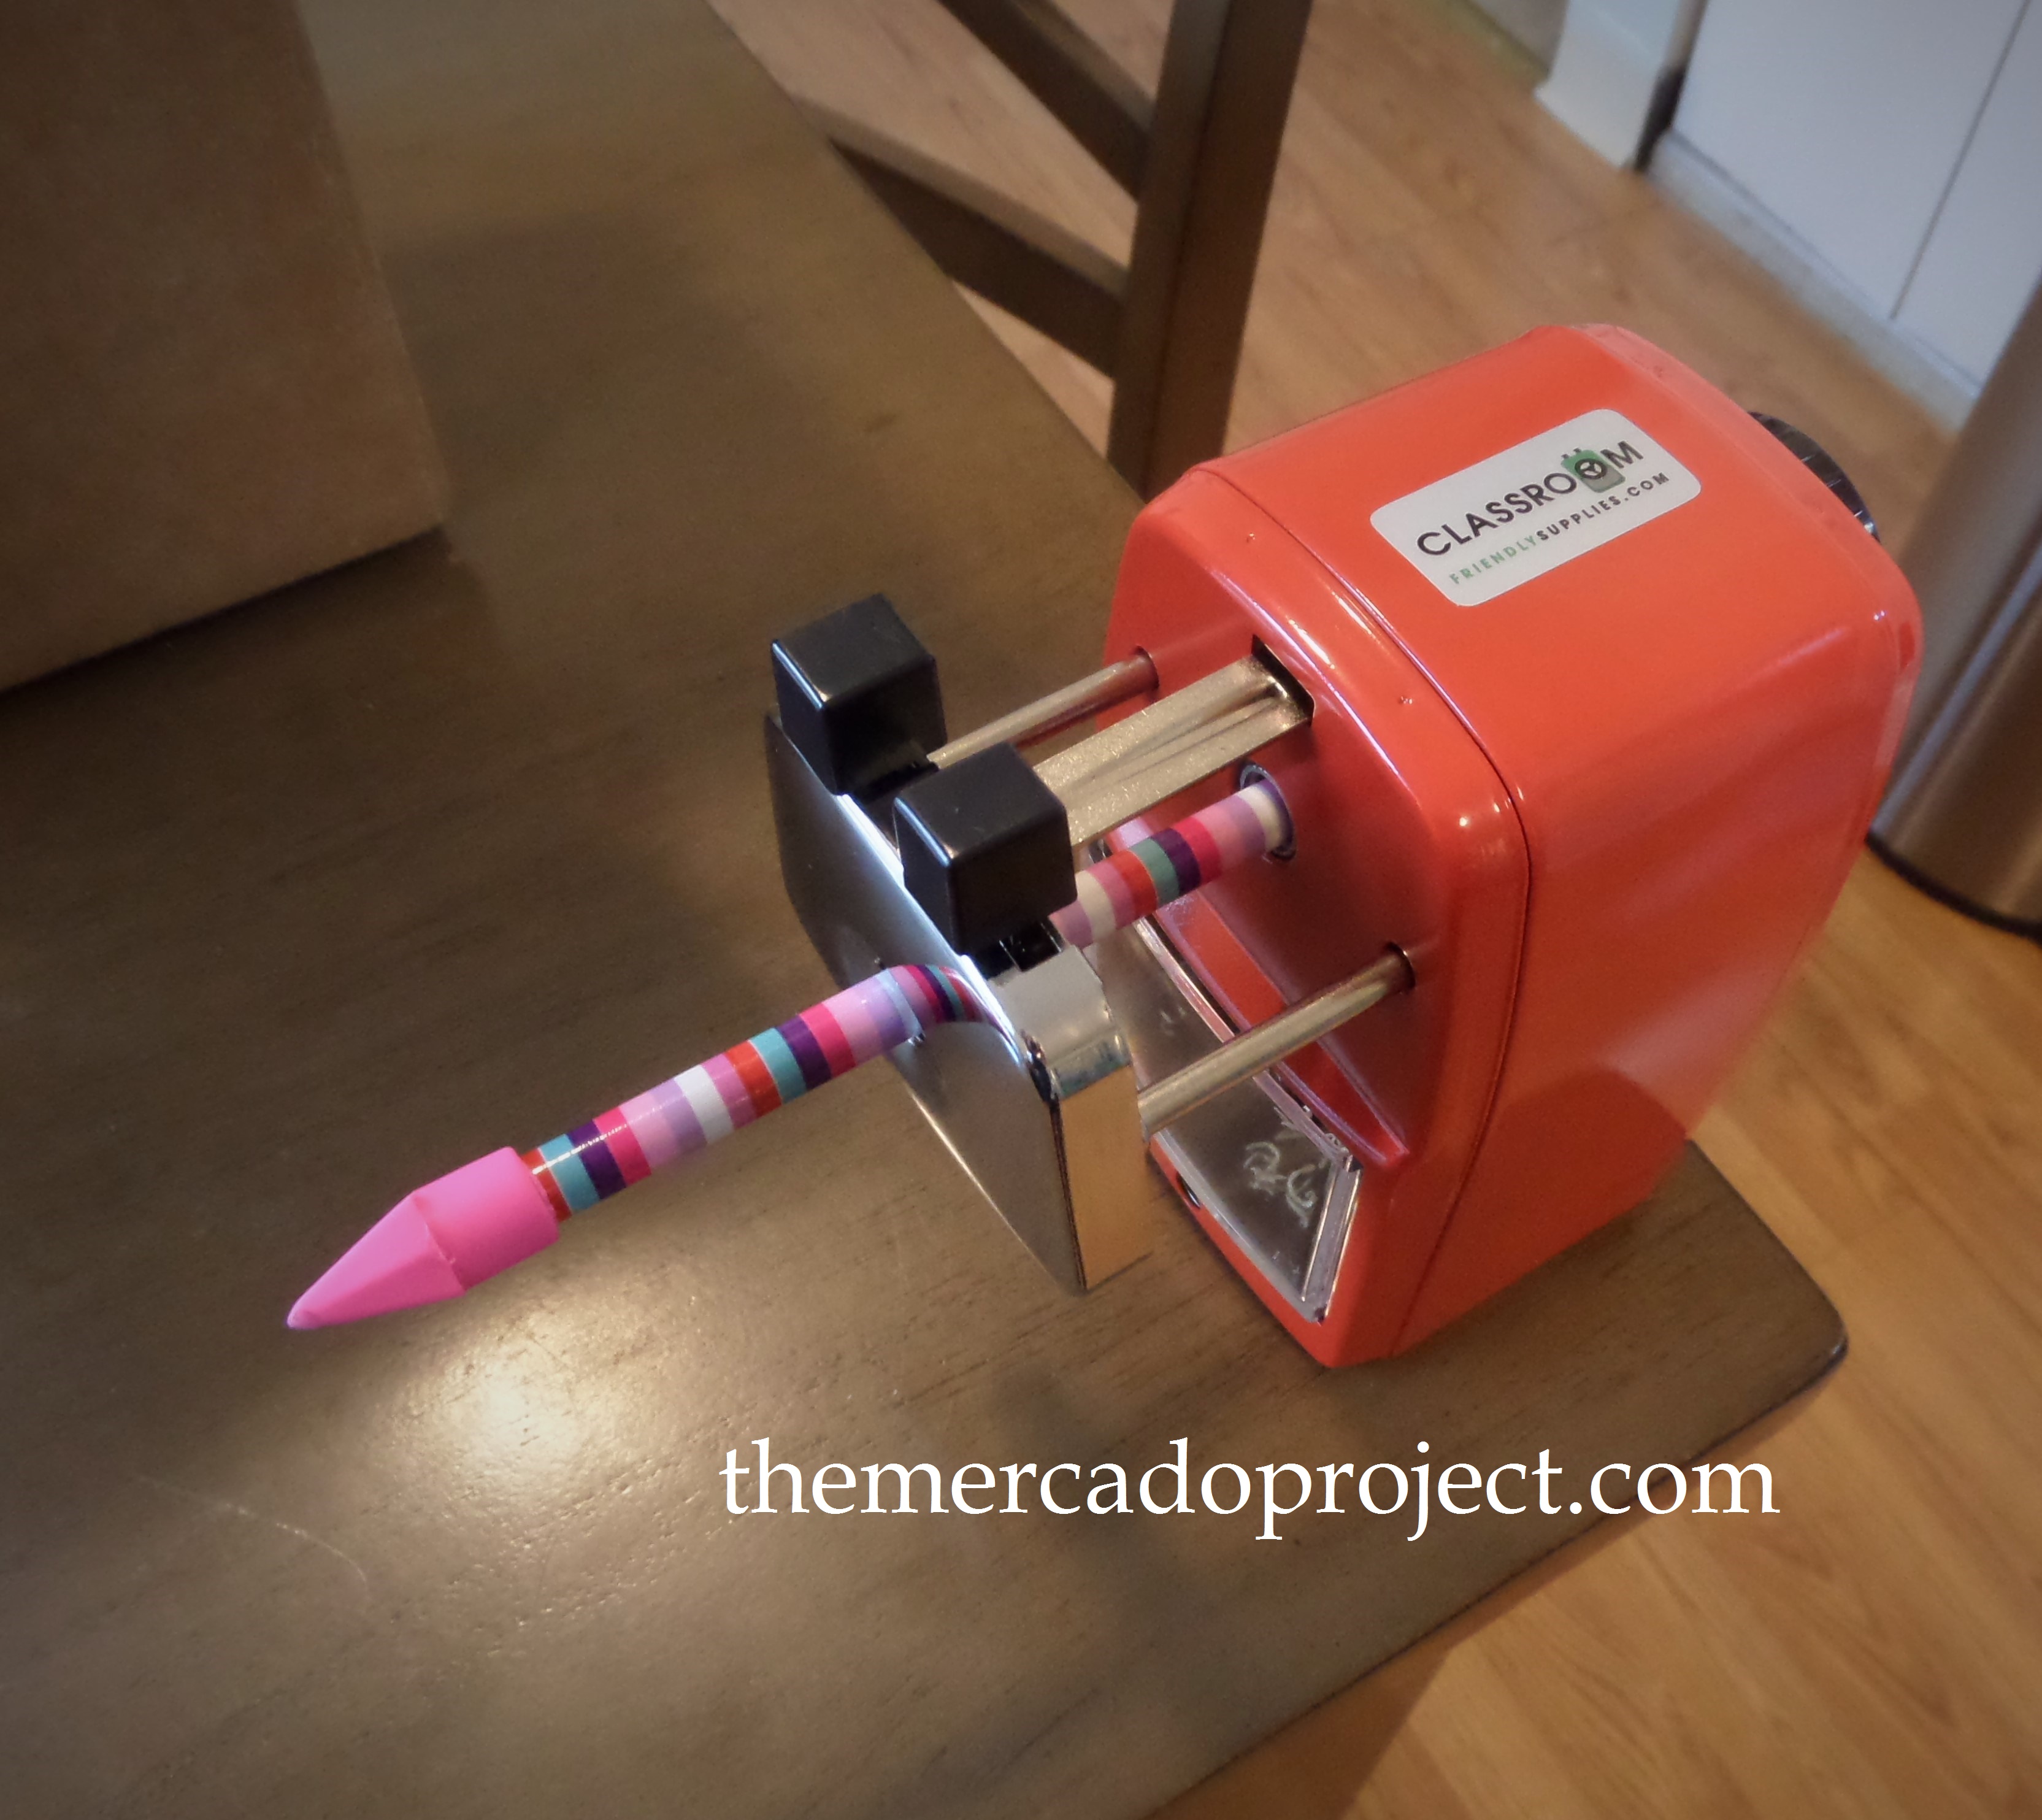
Bring the silver face of the sharpener forward until it clicks into place.  Then pinch the two black knobs on the top together and slide the pencil into the sharpener.  You don’t have to hold onto the pencil.  Finally turn the handle (not shown in this picture, but there’s a picture below where you can see the handle) clockwise and sharpen away.  Pinch the two black knobs to release the pencil.

SAMSUNG CAMERA PICTURES

It doesn’t get any better than that.  Look at that point.  Perfection and easy!  Also the Classroom Friendly Sharpener is much quieter than my electric sharpener, which by the way I haven’t used since getting this one! 🙂

Now let’s try a color pencil:

SAMSUNG CAMERA PICTURES

SAMSUNG CAMERA PICTURES

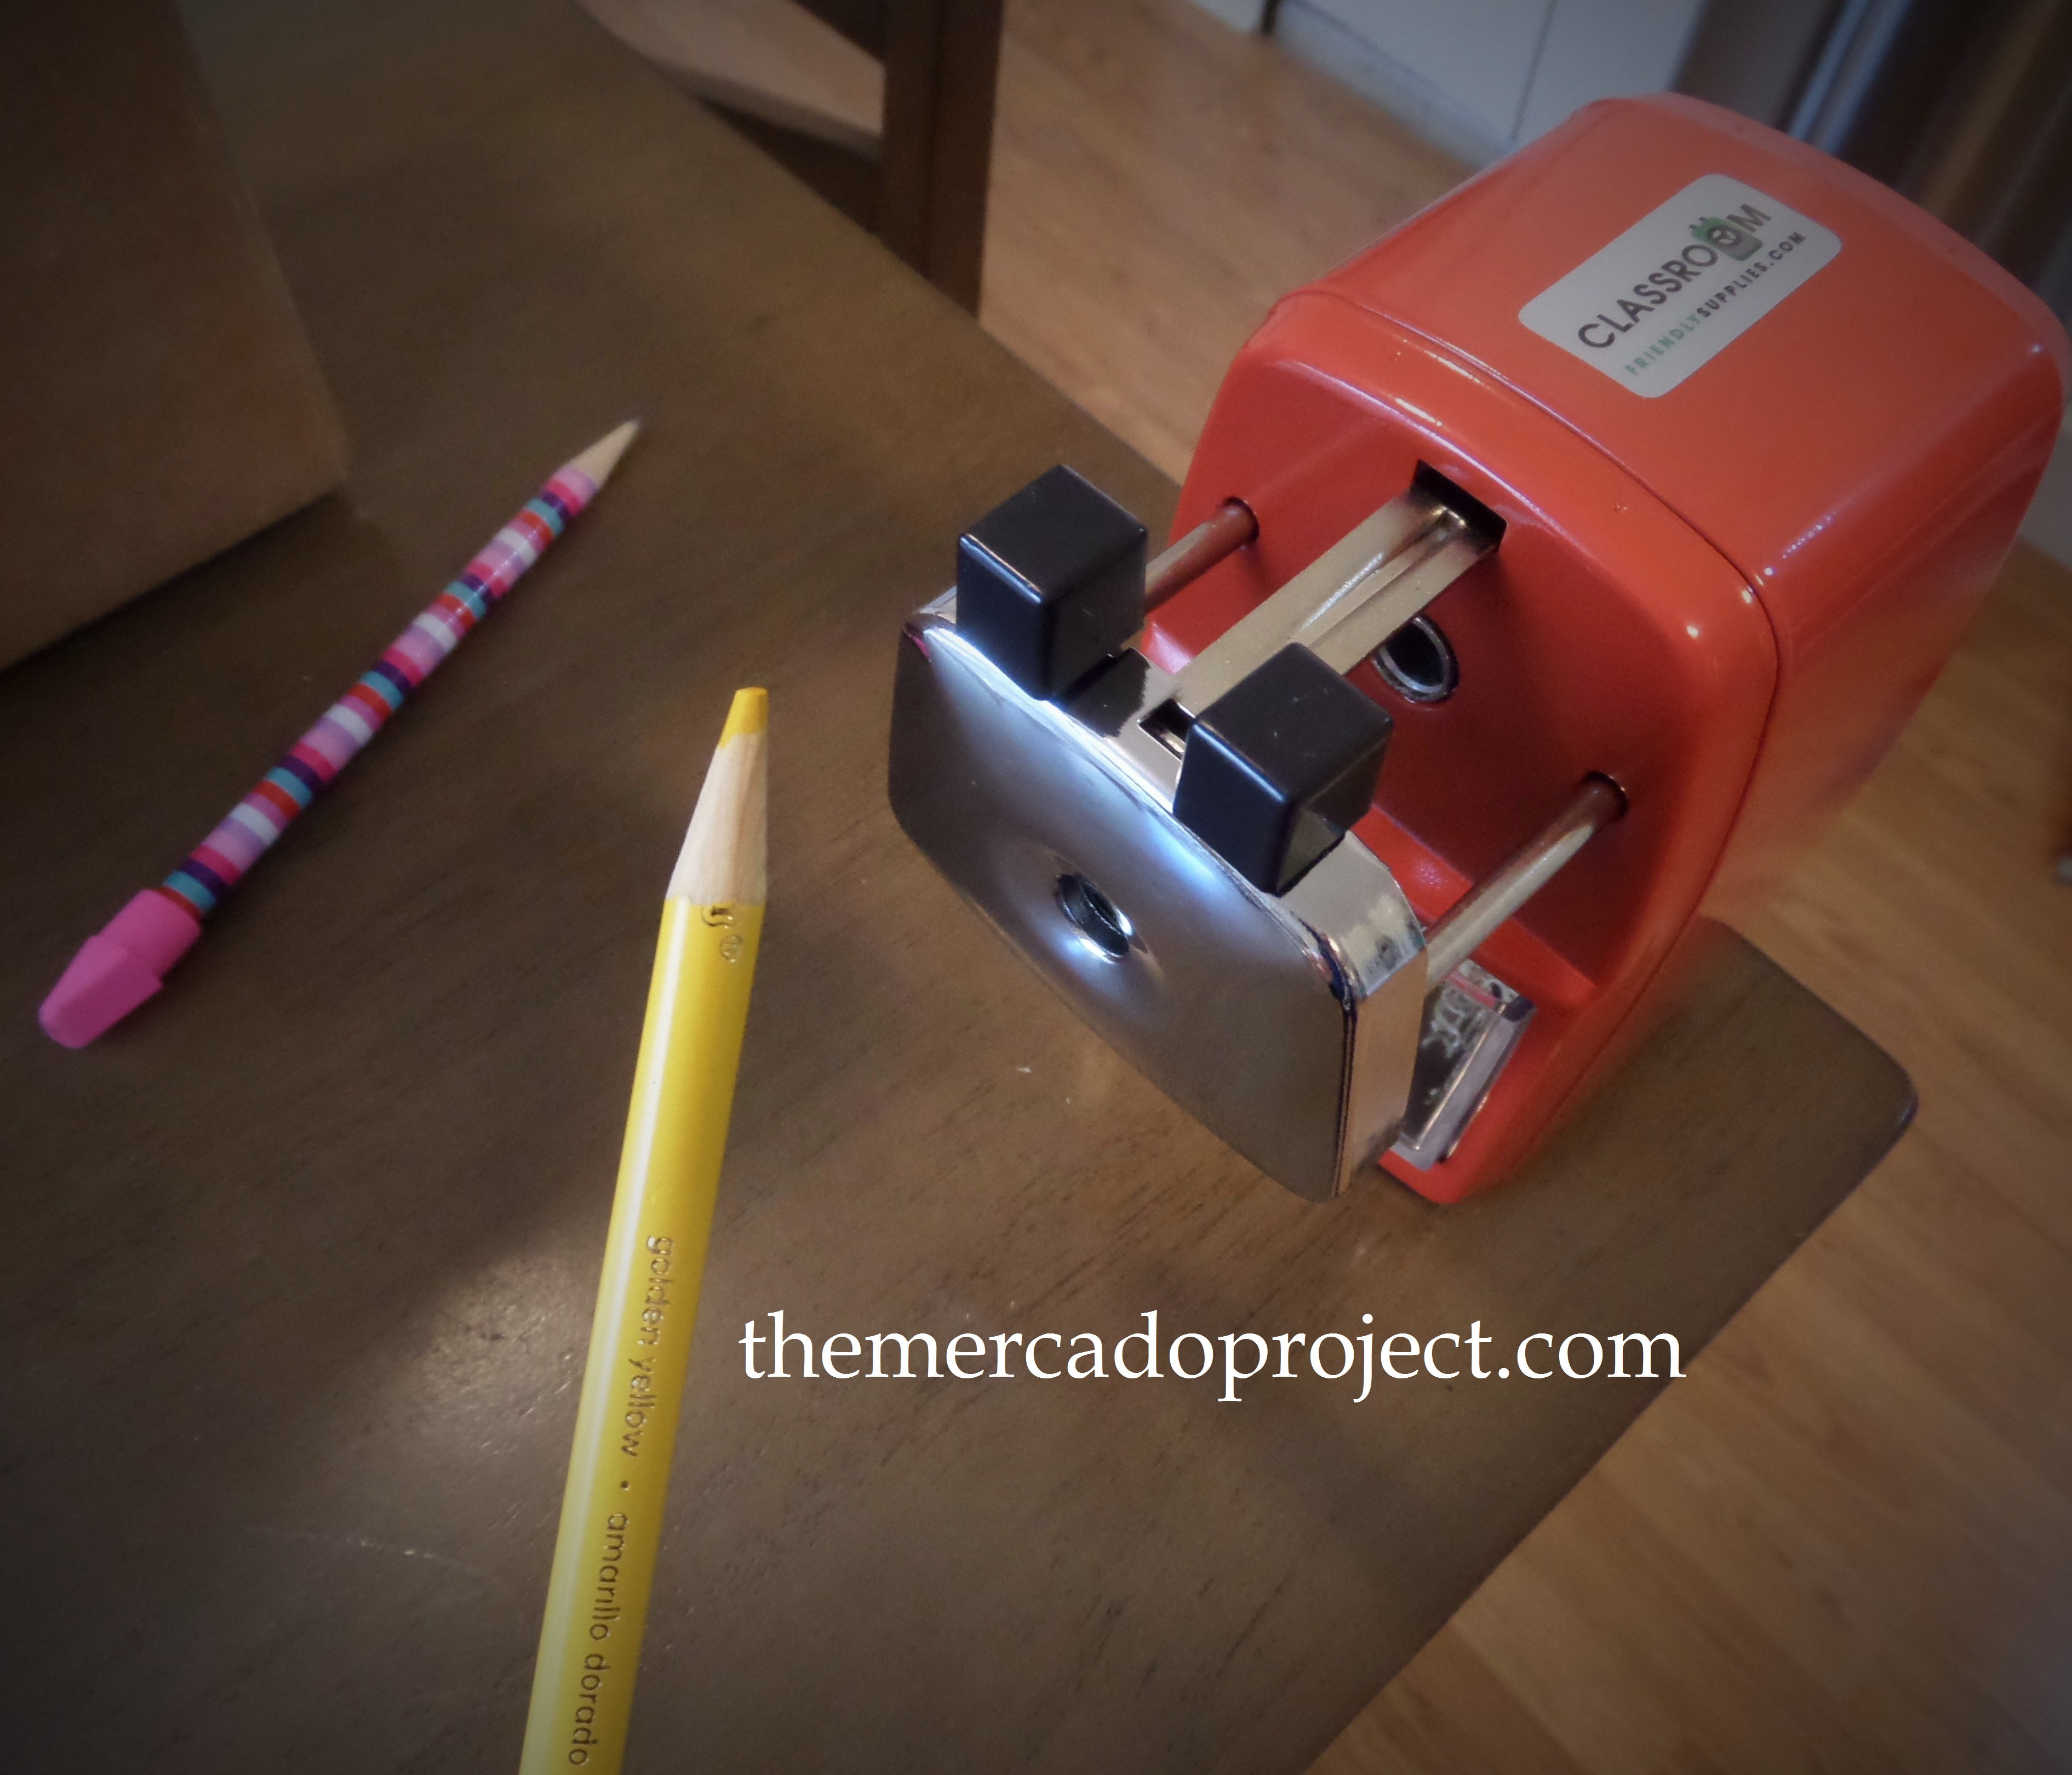
Brilliant!  I’m very impressed with this machine!

SAMSUNG CAMERA PICTURES

The compartment that holds the pencil shavings is easy to remove and clean out!

Needless to say my girls (ages 6 and 9) went crazy when they came home and saw their brand new sharpener.  They went searching for all the pencils that needed to be sharpened and were so impressed with how easy it was to use the sharpener and amazed with the final results.

SAMSUNG CAMERA PICTURES

As you can see in the above picture the Classroom Friendly Sharpener has a handle that you turn clockwise to do the sharpening and it can be mounted for a permanent spot (mounts are available for purchase in the online store).

A pencil sharpener is an essential tool for learning so this sharpener would be a great gift for teachers, schools, friends and family members.  You can even buy them in bundle specials in the online store and donate them! 🙂

You can purchase one of these fabulous sharpeners at the online store and since I’ve joined their affiliate program, click on this link https://classroomfriendlysupplies.refersion.com/c/90e2c so I can receive a percentage of a possible sale.  I greatly appreciate it.  Thanks!

Click on the picture below for instructions on How to Operate the Classroom Friendly Pencil Sharpener.

pencil_sharpener_directions_1024x1024


Happy Holidays everyone and take good care!

Until next time…

Disclaimer:  I received a free product in exchange for my honest review and I was not compensated.

Update:  I have decided to join the Affiliate Program with the Classroom Friendly Supplies Pencil Sharpener so if you decide to purchase this awesome sharpener after reading my review on it just click on this link below and I’ll receive a percentage of the sale.  Thank  you so much for visiting my blog and hopefully purchasing one or more of this wonderful product.

https://classroomfriendlysupplies.refersion.com/c/90e2c


Germ City and a couple of Iron On transfers

Hello everyone!  I hope you guys are well.

As for me, I’ve been to Germ City and back.  I got sick again.  Can you believe it?  Back to back.  I don’t even think I was finished being sick the first time before the second wave hit.  It started with an itchy throat and then BAM!, my body and my head just wanted to curl up in bed and forget about the world, but I couldn’t do that because I have to take my oldest daughter to school in the morning and take care of my two-year old at home.  I will admit to you all that it brought me to tears.  Not having control of my body or the energy to fulfill my obligations as a mother really sucks.  In one moment, my two-year old looked at me and said, “Its ok.”  I love that little girl.  I’m feeling much better now with the help of my wonderful husband (he took over when he came home from work and got me meds!) and my landlady/friend (she made us soup and looked after my youngest daughter while I took my oldest to school).  My body is up and running again so enough about being sick.

Let’s talk about Iron-On transfers!  Last week, I wanted to design a bag for my mother’s upcoming birthday.  I also wanted to make my daughter a t-shirt with her latest obsession, Super Mario and friends.  I found a cool clip art on AOL search, printed it out on iron on transfer paper and ironed it on a white youth t-shirt.  I surprised her with the shirt and she absolutely loved it!

IMG_4037text

I have to do another one for my youngest because she wasn’t happy with the fact that I didn’t make her one.  Oops!

IMG_4039text

For my mother’s bag I took a couple of pictures of her with my daughters as well as one with them striking a princess pose, printed and ironed it onto the bag, which I bought at A.C. Moore.  These bags are awesome.  I’m going to stock up on them.  I think my mom is going to love this bag!

Let your creativity soar and make one-of-a-kind gifts for your loved ones!

Take good care all.

Until next time…

Happy Valentine’s Day!

Hello everybody!  I hope you guys are well and having a great Valentine’s Day!

Instead of chocolate covered strawberries, I made peanut butter chocolate chip cookies.  Everyone loved them!  As for my husband’s gift, which I couldn’t show you before because he’s a follower, here’s what I gave him.

IMG_3940text

I gave him my HEART!

IMG_3938text

I got this cutie at www.uncommongoods.com.  He’s soft, cuddly, and definitely unique!

My daughters loved their Valentine gifts and my oldest had a blast at school celebrating with her teacher and classmates.  Flower vendors were stationed outside of her school selling roses and my daughter asked if she could have a rose.  I said, “Of course, you’re one of my valentines.”

PART_1360887727982texgt

A rose for her, a big smile for me.

This was definitely a great Valentines Day.

Take good care all.

Until next time…

sweet gift

Hello everybody!  I hope you guys are well.  My husband gave me a sweet gift yesterday.

IMG_20130111_133132

He had my blog’s name printed on a shirt.  Love it!

He’s my number 1 fan and I’m his.  His blog is www.workoutdrinkbemerry.com.  You should check it out.  He started blogging first and he inspired me to do my own so thanks luv for the support and the sweet shirt.  A special thanks to my newest followers.

Take good care all.

Until next time…

Mason jar + chocolates = great gift

Hello everybody!  I hope you guys are well.  I wanted to share a gift idea that I put together in order to give several of my closest aunts and cousins.

IMG_3734text

 I bought mason jars at the craft store (A.C. Moore) along with gold ribbon.  The candies I chose are Ghirardelli Chocolate Squares Limited Edition Peppermint Bark (delicious!) and Coconut Malted Milk Balls, which I ordered from www.ohnuts.com.  These are my absolute favorite and they were such a huge hit at my anniversary/renewal party that I decided to gift them again.

IMG_3736text

I made a paper label and tied the gold ribbon around the mason jar.

IMG_3738text

I put the coconut malted milk balls in a clear candy bag just in case they melted and placed 4 peppermint bark squares inside around the mason jar.  I like the way they came out and can’t wait to give them to my family members.  I hope you like this idea.

Take good care all.

Until next time…

DIY IRON ON TRANSFER T-SHIRT

Hello everybody!  I hope you guys are well.  My heart is still quite heavy regarding the tragedy that occurred in Newtown, Connecticut.  I’m a mother of a kindergartener.  I don’t know what I would do.  I do wish everyone love, support, patience, and peace.

I wanted to share with you something that I’ve done as a gift for my father for years now.  The other day he wore a shirt that I had personalized for him using iron on transfer paper and fabric markers.  I made that shirt a looooong time ago and I was so surprised to see that he still had it and that it still looked great.  My mom mentioned to me that he loves wearing the shirts that I make for him, especially the ones with his grand-daughter’s pictures.  She said, “those are his favorite because he gets to show everyone his grandkids!”  Love it!

Here’s my process:

IMG_3608text

I purchased my iron on transfers and t-shirt at A.C. Moore.  The shirt was on sale for $2.99 and with a store coupon, I was able to get the transfers for half off.

IMG_3635text

Choose and print out your picture.  For this particular brand, I had to print my image as a REVERSE IMAGE.

IMG_3641text

You’ll need an iron and I use this piece of wood, specifically for my t-shirts so I just store it away when I’m done, along with a pillowcase.  I place the pillowcase on top of the wood so I can have a hard but smooth surface.  I always do the transfers on the floor so I can press down on the iron.

IMG_3642text

Cut out your design or image and place it on your t-shirt right side up so you can see exactly how it’s going to look.

IMG_3644text

Flip over the paper and center it once again.  I usually like to place the image one finger long down from the neck.

IMG_3646text

PrintWorks instructions: “Iron transfer with firm pressure in a straight, non-stop motion top to bottom and side to side.  Keep iron moving at all times to prevent scorching.”  Make sure your corners are ironed down.

IMG_3648text

Let your t-shirt cool off completely (this part is hard for me because I’m so impatient).  Then carefully peel away the transfer’s backing.

IMG_3652text

I LOVE IT and I hope my dad loves it too.

I hope you guys enjoy this gift and crafting idea.

Take good care.

Until next time…

A year round gift

Hello everybody!  I hope you guys are well.  I can vividly remember the first time I gave my mother a custom-made family calendar as a Christmas gift to her.  She started crying!  It was of course tears of joy, but I wasn’t expecting her to cry.  Be overjoyed, yes, but not cry.  Needless to say, she absolutely loved it.  She completely immersed herself into the calendar.  It was as if the world around her suddenly disappeared and it was just her and this gift that she couldn’t wait to see.  I watched her intently.  She paused at each month and you could see her eyes darting here and there, taking in all of the images.  A loving smile would appear on her face and I knew she was looking at pictures of herself with my daughters, her only grandchildren, so far.  A small laugh would escape her when she saw the funny pictures.  I got a few “Oh my gosh,” and when she reached the end of the calendar, she let out a big, “I love it!”  Sweet music to my ears.

There are many places and web sites where you can make a calendar.  So far, I’ve made mine on www.shutterfly.com because they offer great promo codes and free shipping.  The calendars always come out great.  Since I like to include more than one picture, it usually takes me more time to assemble them into place.  Once you’re done and you complete your order, the calendars are on your doorstep fast!  My cousin loves taking her pictures to Wal-Mart and making her calendar there herself!  She’s the one who gave me the idea to give a calendar as a gift because she sends me one every year.  Another tradition that we’re forming and I love putting it on my kitchen wall and looking at my gift year round.

Stay alert, stay alive.

Until next time…

LOVING THIS…

Hello everybody!  I hope you guys are well.  I received my latest Lisa Leonard Design and I love it.

I don’t like fussy jewelry.  This tiny token heart necklace on www.lisaleonardonline.com went on sale and I couldn’t resist.  I love the simplicity of it.  My next purchase is most definitely going to be the tiny twig necklace.  I have been eyeing that piece for a while now.  Maybe my hubby will get it for my birthday in December.  Hint, hint! 🙂  Check out Lisa’s designs for meaningful gift ideas.

Take care all.  Until next time…

DIY fabric covered wooden letters

Hello everybody! I hope you guys are well.  I wanted to share with you my second project that I did this past Friday.

I’ve had this letter A and this pink toile fabric for a long time now.  I love this fabric so much that I decided to use it to decorate the letter A, which is my first initial.  I’ve never done this project before so I just did it my way and took pictures highlighting each step that I thought was helpful.  Basically, it’s like wrapping a present and using glue instead of tape.

Here’s what I did:

Using a ruler I outlined the letter (I didn’t trace it) on the front of the fabric because I needed more fabric for the sides and I wanted to see exactly what part was going to show.  I also used a vanishing marker.

I used my rotary cutter and mat.

This time I traced the letter on the other side of the fabric so I could know exactly where to place it down once I applied the glue to the letter.

I glued the letter down and these were my tools.  I used my x-acto knife, sharp scissors, a ruler (borrowed from my daughter :)), vanishing marker, glue, and a Q-tip (the top of my glue was broken so I used a Q-tip to apply the glue onto the front and sides of the letter).

Using my ruler, I started marking where I would cut and glue the fabric.  The process was like wrapping a gift.

As you can see in the pic above I lost some of the fabric due to the curve of the letter A so I just took a small piece of fabric and glued it onto the spot and then covered the side with the rest of the fabric already there.

Working my way around…progress.

For the little hole in the letter A, I used my x-acto knife and made a cut in the form of a cross all the way to the edge and glued the fabric.  At the bottom of the A, I used my sharp scissors and made cuts at the corners and glued the fabric as neatly as I could.  As you can see, there are some parts that are not covered.

Just take a scrap piece of fabric, make sure that it covers the area well and glue it on.  Now you’re covered!

Same process and…

…I’m done!  I love, love, love my fabric covered wooden letter.  After taking this picture so you guys can see it,  I placed it on my dresser and it looks fabulous.  I’m so happy with the result.  Now, I have a great gift idea and more arts and crafts to do for the future. 🙂

I hope you like this crafty idea.

Take care all.  Until next time…

DIY Diaper Cakes

Hello everybody!  I hope you guys are well.  Today I’m going to talk about one of my favorite baby gifts to give at a baby shower.  A long time ago, ok 2008, my sweet cousin Rosie was pregnant and expecting a boy, and I wanted to give her something cool, unique, and practical.  Enter diaper cakes!  I researched online for a unique baby gift and the diaper cake kept popping up, so I read articles and blogs in order to see what you needed to make one and how to do it yourself.  I also viewed YouTube videos and they helped out a lot with the visual aspect.  Like I said before, I don’t have a great memory, but because this project brings me so much joy in constructing it and giving it as a gift, I do remember the sheer anticipation when I tackled my first diaper cake.  I had a lot of fun!

My list of essentials in order to make a cake includes an empty wrapping paper tube (it’ll be your starting point where you begin assembling the diapers around it, once you finish the tube will be hidden), rubber bands (to wrap the individual diapers and then wrap them to the tube in place, making the towers), ribbon (to hide the rubber bands), baby toys (for decoration and added gifts), baby toiletries (for decoration and added gifts), baby blankets (roll them up and insert into diaper cake just like the diapers), clip art (optional), curling ribbon, (optional), assorted mini baby decorations such as pacifiers, safety pins, etc. found at the craft store (optional), a piece of wood or very thick cardboard (for the cake to sit on), and of course diapers!

This was the first diaper cake I made.  My family and my cousin’s friends loved it.  It looked great on the table and it was one of a kind.  This cake made everyone happy, especially the expectant parents, because diapers are one of the most important gifts one can give.

I wish that I would have taken step by step pictures but back then, that thought never occurred to me.  I’m happy that at least I took a picture of the finished project.  After that cake, I did some more but again I only took pictures of the finished project and unfortunately at this time, no one is expecting.  So until, you can always do what I did and research online.  Look at different cakes for inspiration and DIY.  This is a project with endless possibilities.

Here are pictures of all the cakes I’ve made:

This diaper cake was for my sister-in-law.  This one came out wider than the first.  I stuffed a lot of diapers, which made the top big enough to sit two stuff animals, wash cloths in the center forming the “candle or cake topper”, and letter sitters (sadly, discontinued) spelling out the baby’s nickname, A.J.  Everyone kept asking, “You made that?”  I would nod and they would say, “Amazing!” 🙂

This diaper cake was for my dear friend, Francine.  It was the tallest, widest, and heaviest cake I’ve ever made.

This was the cake topper that I chose and I thought it was the most adorable thing ever.  It was a clay baby figurine that I found at Lady Jane Craft Store.

This cake was smaller and I used the letter sitters (sadly, discontinued) to spell out bella (short for Isabella) to decorate the top.

And last but definitely not least,

my Rock and Roll Princess diaper cake, which I made for my sister-in-law’s second child.  I placed a pair of brand new black, patent Mary Janes on top as the cake topper.  For decorations, I used a princess crown, pink feather boas, and on the base I glued gingham ribbon to make the skirt for the cake to sit on.  A hit once again!!

I can say wholeheartedly that I had so much fun making each and every single diaper cake.  I hope you enjoyed looking at these pics.  Until next time…